Saturday, August 24, 2019

Lemon Meringue Cupcakes

I am on a kick of changing pie flavors into cupcakes, and if that's wrong, I don't wanna be right. These sweet little babies have a graham cracker crust, a lemon cake filled with lemon curd, and a 7 minute frosting lightly torched. Curb. Appeal. For. Days. 

This recipe makes 24 cupcakes (with a little extra) or three 8-inch cake rounds. 

For the Lemon Curd
I am still using Ina Garten's lemon curd recipe because it's delicious. This is also good to make in advance- at least a few hours or even the night before.

3 lemons *bullshit, Ina.
1 ½ c granulated sugar
¼ pound unsalted butter, room temp (that’s 1 stick)
4 extra-large eggs
½ c lemon juice (3 – 4 lemons) *Really, it depends so much on how juicy your lemons are. Sometimes it takes me 6 lemons, and sometimes 4. So what I'm saying is buy more lemons than you think you will need. 
1/8 tsp salt

1. Using a vegetable peeler, remove the zest of 3 lemons, being careful to avoid the white pith. Put the zest in a food processor. Add the sugar and pulse until zest is very finely minced into the sugar.
2. Cream the butter and beat in the sugar and lemon mixture.
3. Add one egg at a time, and then add the lemon juice and salt. Mix until combined.
4. Pour mixture into a 2-quart saucepan and cook over low heat until thickened, about 10 minutes, stirring constantly. The lemon curd will thicken at about 170F, or just below a simmer. For this recipe, I kept cooking it for about 10 more minutes because I wanted it to be thicker so that it would not squish out of the cake layers.
5. Remove from heat and run through a strainer to get any lumps or bigger pieces of zest out of it. Cool or refrigerate. I put it in mason jar and let it cool slightly before putting the lid on and putting it in the fridge. 

For the Graham Cracker Crust
2 c graham cracker crumbs *I just bought the box because I couldn't be bothered, but if you have a little pent up anger that you wanna take out on some grahams, you do you boo.*
2 tbsp brown sugar
1/2 stick (4 tbsp) unsalted butter, melted
Pinch of salt

1. Preheat oven to 350F and prepare 24 cupcake tins with liners (and I also did a 6-inch pan because, like I said, extra batter- ie snackies for baker if you have to take these cupcakes to an event and can't eat them all by yourself in a dark room like you want to).
2. Combine all ingredients in a bowl and mix. Test with your hand- squeeze it in your hand and see if it lightly packs together.
3. Take about an 1/8 c or so of the graham cracker mixture and put it in the bottom of each lined tin.
4. Take a 1/4 c measuring cup and use the back of it to pack the crust down into the bottom of the tins.
5. Cover with the batter that follows (no need to bake beforehand).
*Side note- I did not put graham cracker crust in the bottom of my extra cake pan. I just sprinkled the crumbs on top of the cake later*

For the Lemon Cake

1/3 c vegetable oil
One stick unsalted butter, room temperature
3 large eggs
2 c granulated sugar
3 1/2 c all-purpose flour
1 c buttermilk
1 tsp salt
1 1/2 tsp baking soda
2 tsp baking powder
1 tsp vanilla
Zest and juice of 1 lemon (although more wouldn't really hurt)

1. Combine oil, butter, and granulated sugar and cream together in a stand mixer fitted with paddle attachment.
2. Add eggs one at a time, incorporating each before adding another.
3. Add vanilla.
4. Combine flour, salt, baking soda, and baking powder together in a separate bowl.
5. Alternate dry ingredients and buttermilk, incorporating each into the batter before adding more. Start and end with the dry ingredients.
6. Incorporate the lemon zest and juice into the batter and mix.
7. Divide batter into cupcake tins and bake for 18 - 22 minutes or until a toothpick inserted comes out clean.

For the 7 Minute Frosting
I used Smitten Kitchen's recipe for the frosting- it is also known as a marshmallow frosting. Light and fluffy and perfect for a torch!

4 large egg whites
1 c granulated sugar
1/2 c light corn syrup
4 tbsp water
2 tsp vanilla extract
Pinch of salt

1. Combine all ingredients into a metal bowl (I used my bowl of my stand mixer, and you will see why in a minute). 
2. Place metal bowl over a pot of simmering water- it should just barely be touching the bottom of the bowl. (For a stand mixer, you can have it go past the part that connects to your mixer and touch the bottom of the actual bowl part- you get what I mean). 

3. Beat with a handheld mixer until light and fluffy- about 7 minutes (hence the name). Mine took a little longer because I didn't let the water start simmering beforehand. 
4. Take the bowl off the simmering water and put it on your stand mixer. Mix until it gets suuuuuuuper fluffy and is cooler. 

Assembly
1. Once the cupcakes have cooled, take a piping tip to make a small hole in the center of the cupcake. 
2. Take the cooled lemon curd and put it in a piping bag (or just a ziploc bag) and cut the tip off to fill in the holes in the cupcakes. 
3. Put your frosting in a big piping bag and cut a BIG hole. Pipe fluffy mcflufferson clouds on top of your cupcakes. 
4. If you have a kitchen torch, go to town on your frosting for a nice little sun tan on the cupcakes. 

Sunday, August 18, 2019

Peach Pie Cake (and/or Cupcakes)

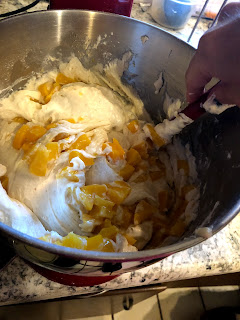
It was my friend Elizabeth Carter's birthday, and this cake was in celebration! I asked her what she wanted, and she was like anything, and I was like give me a flavor at least, and she said peach. My first thought was peach pie, but then I was like, wait... what about if peach pie and peach cake had a baby! This is a 3 layer cake with peach preserves and pie crumble topping between the layers, topped with a cinnamon buttercream, and really from start to finish, I think it was just a little over two hours, so not bad at all. I have also done this as cupcakes- cut a little hole in the cupcakes and fill with peach preserves. Add the buttercream on top and crumbles!!  This recipe makes three 8-inch round cakes OR 24 cupcakes (with a little extra).

For the Cake:
This is pretty much my same pineapple cake recipe subbed with peaches instead.
1/3 c vegetable oil
1 stick unsalted butter, room temperature
3 eggs
2 c granulated sugar
2 c all purpose flour
1 1/2 c cake flour
1 tsp salt
1 1/2 tsp baking soda
2 tsp baking powder
1 tsp vanilla
1 c buttermilk
8 oz by weight of canned peaches, chopped into small chunks *this was about the whole amount of a 15oz can of peaches also SAVE THE JUICE*
1/2 c peach juice *see, told you to save the juice- this was pretty much all the juice in my can of peaches*

1. Preheat oven to 350F and prepare three 8-inch round cake pans with goop.
2. Combine vegetable oil and butter in the bowl of stand mixer fitted with paddle attachment.
3. Gradually add in the granulated sugar and whip until light and fluffy.
4. Add in eggs and vanilla to the sugar mixture.
5. In a separate bowl combine dry ingredients: flour, salt, baking soda, and baking powder.
6. Pour 1/3 of the dry ingredients into the sugar mixture and mix to combine.
7. Pour the buttermilk into sugar mixture and combine.
8. Pour another 1/3 of dry.
9. Pour the peach juice in and mix to combine.
10. Pour in the last 1/3 of the dry ingredients.
11. Add the peach chunks and stir to incorporate.
12. Divide the batter between the three cake pans. Bake for 22 - 27 minutes or until a toothpick inserted comes out clean.
13. Allow to cool slightly before turning out on a cooling rack to cool completely before assembly.

For the Crumble:
2/3 c brown sugar
2/3 c unsalted butter, cold and cubed
1 c all-purpose flour
1/4 tsp cinnamon (I measure with my heart, so this is an estimate)
Pinch of salt

1. Turn oven up to 375F. Prepare a baking sheet with a piece of parchment paper.
2. Combine all ingredients in a bowl and squish together with hands (or a pastry cutter) until you have small chunks of butter throughout, about the size of peas.
3. Turn it out onto the baking sheet and bake for 15 - 20 minutes until golden brown, mixing every 5 minutes or so. *It will look melty in the oven, but it'll come together. Don't worry.
4. Allow to cool completely- it will get crunchy as it cools. *Also, this made more crumble than I used, so you could make less, or you could make this amount and have the best yogurt topping for your breakfast or a delicious snacky snack whenever you want. I always opt for snacks.

For the Cinnamon Buttercream:
4 sticks of unsalted butter, room-temp
5 c (ish) powdered sugar, sifted
1/4 tsp cinnamon (again, measure with your heart)
1 tsp vanilla (saaaaame)
1/4 tsp salt
*Optional to add a splash of milk or cream- I did this (actually a splash of buttermilk because that's what I had)

1. Put butter in a stand mixer fitted with paddle attachment. Start mixing.
2. Slowly add powdered sugar until incorporated.
3. Add in cinnamon, vanilla, and salt. Whip until fluffy.

Assembly:
1. Place a dollop of frosting on your cake stand. Add first layer of cooled cake (if you need to level your cakes, do so before assembly with a serrated knife).
2. Put about 1/3 of the buttercream into a pastry bag equipped with a large round tip (or you can just use a ziplock bag if you don't have a pastry bag. Just fill and cut a hole in the corner of the bag).
3.. Take your peach preserves and put a layer of preserves on the cake layer, leaving a little space at the edges.
4. Pipe a dam of buttercream around the peach preserves.
5. Add a layer of crumble topping on the peach preserves.
6. Add second cake layer and continue process. 
7. Add last layer and cover the whole cake in buttercream. (I didn't add peach preserves to that last layer because it's on top.)
8. Add more crumble topping on top of your cake for decoration.

Here's the Cupcakes:
1. Pour the same batter into cupcake tins with liners. Bake for about 18 - 22 minutes or until a toothpick inserted comes out clean.
2. Take a piping tip (or I used a pairing knife) to make a small hole in the center of each cupcake.
3. Put peach preserves in a piping bag (or a ziploc bag with the tip cut off) and pipe into the center of each cupcake.

4. Top each cupcake with a dollop of buttercream. I tried to make a dip in the middle of my buttercream so that it's easier to top with crumbles! 

Tuesday, August 13, 2019

Funfetti Cupcakes


These cupcakes are the epitome of childhood. I will say that these guys are a slightly different texture than those fluffy store-bought cupcakes. They have more chew to them, and I'm down with that. They are slathered with a vanilla buttercream and sprinkles and no child (or adult) has ever turned that away! My five-year-old niece ate two in one sitting! (Don't tell her mother.) This makes 24 cupcakes (with a little extra batter- which I just pour into a small cake pan and that's my baker snack- you know if you're taking cupcakes somewhere and so you don't get to eat any of them because they're for a party? Well, problem solved.) This also can make three 8-inch round cakes.

For the Cake:
1/2 c vegetable oil
1 stick unsalted butter, room temperature
3 eggs
2 c granulated sugar
2 c all purpose flour
1 1/2 c cake flour
1 tsp salt
1 1/2 tsp baking soda
2 tsp baking powder
1 tsp vanilla
1 1/2 c buttermilk
Zest of 1 lemon *optional*
Sprinkles- measure these with your heart. I probably put like 1/3 cup, but I literally poured them in until I got the amount that I wanted.

1. Preheat oven to 350F and prepare 24 cupcake tins with liners.
2. Combine vegetable oil and butter in the bowl of stand mixer fitted with paddle attachment.
3. Gradually add in the granulated sugar and whip until light and fluffy.
4. Add in eggs and vanilla to the sugar mixture.
5. In a separate bowl combine dry ingredients: flour, salt, baking soda, and baking powder.
6. Pour 1/3 of the dry ingredients into the sugar mixture and mix to combine.
7. Pour 1/2 of the buttermilk into sugar mixture and combine.
8. Pour another 1/3 of dry.
9. Pour second 1/2 of buttermilk.
10. Pour in the last 1/3 of the dry ingredients.
11. Add in lemon zest and sprinkles and stir to incorporate.
12. Divide the batter between cupcakes liners. Bake for 18 - 22 minutes or until a toothpick inserted comes out clean.

For the Buttercream:
4 sticks unsalted butter, room temperature
5 c (ish) powdered sugar, sifted
1 tbsp vanilla
Pinch of salt
*Again, you could put a bit of lemon zest in here. I did.*
**You could also add a splash of heavy cream to loosen it up if you like. I did not.*

1. Put butter into stand mixer fitted with paddle attachment and start to mix.
2. Slowly incorporate the powdered sugar.
3. Add vanilla and salt.
4. Whip until light and fluffy. If you feel like it's too loose, add more sugar. If it feels too tight, add a splash of cream or milk.
5. Slather on everything. Everything.

Assembly:
1. I don't feel like this really requires explanation, but here you are.
2. Take cooled cupcake. Put on buttercream. Add sprinkles on top.
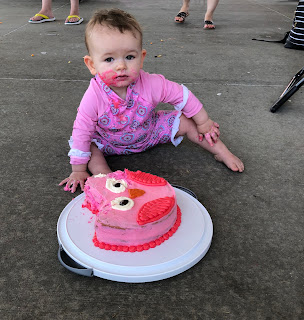
3. Here's a bonus picture of my niece with her funfetti smash cake on her first birthday!
Bonus:
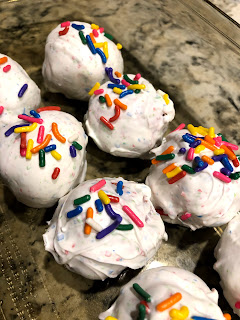
I have also used excess cake and buttercream and made some cake balls. (I made too much cake for the party. I don't know what happened....)
1. Take leftover cake (that is not "dressed with buttercream yet"- although honestly, I bet you could do this just with leftover cake and cupcakes in general as well- let's try that and reconvene.) and crumble with your hands in a bowl.

2. Add leftover buttercream (mine was pink for this last round of funfetti cakes- it's whatever). You are looking for a consistency that can stay together when you ball some of it up in your hand.
3. Scoop out mixture with a cookie scoop and place them on a parchment lined cookie sheet (or you could just use a spoon- although the scoop does allow for more consistency).
4. Once you have scooped them, gently roll them in your hands to create a ball shape. Allow to cool in fridge for about 45 minutes to an hour. (That pink color kinda makes them look like meatballs lol).
5. Melt candy melts (or white chocolate- I did both because I didn't buy enough candy melts) in microwave at 15 second intervals. Be careful not to overheat. Stir after each interval. Take out of microwave when there's still just a few lumps in the chocolate. Stir til completely smooth.
6. Take cool cake balls and dunk in chocolate with a fork, knocking excess chocolate off before landing it back on the parchment. Immediately put sprinkles on top- the chocolate hardens faster than you would think.
 

Tuesday, August 6, 2019

Chocolate Chip Cookies


Yeah, we are gonna go straight up chocolate chip cookies. No frills. No fuss. 100% delicious. These are an old friends' recipe that I have used for many years and have never found another recipe that exceeds this (IMO). They have a little chew, a little crunch around the edges, and that perfect hint of salt at the end. This recipe makes like 4 dozen cookies, so prepare yourself for a lot of them and for the fact that they will still only last like 20 minutes. 


For the Cookies:
2/3 c unsalted butter, room temperature
2/3 c vegetable shortening
1 c granulated sugar
1 c brown sugar
2 eggs
2 tsp vanilla *measure with your heart*
3 c all-purpose flour
1 tsp baking soda
1 tsp salt
12 oz semi-sweet chocolate chips *or whatever chips you want; you do you, boo*

1. Preheat oven to 350F.
2. Combine butter and shortening and both sugars into a stand mixer fitted with paddle attachment and beat for a few minutes to cream together. The mixture will look a little fluffy.
3. Add eggs one at a time, incorporating after each one. Add the vanilla and mix.
4. In a separate bowl, combine dry ingredients. Slowly add dry ingredients to wet, scraping down the bowl occasionally, until fully incorporated.
5. Mix in the chocolate chips. *I just do this by hand so that the mixer doesn't destroy my chocolate*
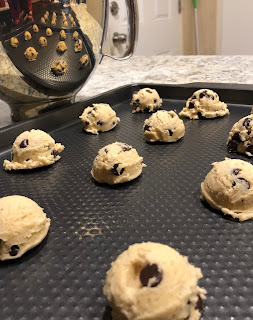
6. With a small ice cream scoop (or just spoons) drop 12 cookies on an ungreased cookie sheet, leaving a little space for them to spread.
7. Bake for 10 - 12 minutes or until golden brown. If you want them softer, take them out sooner; if you want them crunchier, you can bake a little longer.
8. Enjoy straight out of the oven, huddled in a corner so that no one can see you as you shovel them in.

Gluten Free Brownies

This recipe is riffing off of a flourless chocolate cake recipe I have used in the past. So, like duh, it's already, gluten free, but I ...