Monday, August 31, 2020

Cookies and Cream Brownies

Obviously, I am in a cookies and cream place. It's not the worst place I've been though, so I'm fine with it. This uses my regular brownie recipe with a few additions. I also baked it in a 9x13 instead of an 8x8, so they were thinner. It gave me more surface area for the cheesecake swirl, so that's why I did it, but if you want fatty brownies, you follow your heart. 

For the Brownies:

1 stick unsalted butter

8 oz chocolate chips (you're really going to use the whole 12 oz bag, but 2/3 of it for now)

1/2 c brown sugar

1/2 c granulated sugar

3 eggs

1/2 c flour

1/4 c cocoa powder

1/4 tsp salt

1 tsp vanilla extract 

4 oz chocolate chips for mixins (see, I told you)

8 Oreos crushed up (big chunks is fine)

1. Preheat oven to 375F. Grease 13x9 pan (I just used cooking spray). 
2. Put 8 oz chocolate chips and butter in a heat-safe bowl and microwave in 30 second intervals until chocolate and butter are just melted. Don't over-heat. If there's still a few lumps, just stir, and the residual heat will melt everything. 
3. Add sugars to the melted chocolate mixture and combine. This will help cool the chocolate off a little before you add the eggs.
4. Add eggs one at a time and mix well before adding the next. Add vanilla.
5. Add flour, cocoa powder, and salt to the bowl and mix well to combine. Don't worry about over-mixing here. 
6. Add the other 4 oz of chocolate chips now and about 2/3 of the Oreo chunks; stir to incorporate. 

For the Cheesecake Swirl: 

4 oz (half a block) cream cheese, room temp

1 egg

1/4 c granulated sugar

Splash of vanilla

1. Using a mixer, beat to combine all ingredients. 

Assembly:

1. Pour brownie batter into prepared pan. Top with the cheesecake swirl- I just poured lines of the cheesecake mixture. 

2. Take a knife and create swirls with the chocolate and cheesecake layers. 

3. Top with the remaining Oreo chunks. 

4. Bake at 375F for about 30 - 40 minutes. *I baked them for 30 minutes, and they were still a little gooey, which I mean isn't a bad thing, but they could've stood a few more minutes. My oven is also notorious for this, so still check at 30 minutes. 

Wednesday, August 19, 2020

Cookies and Cream Macarons


Here we are again, back at our favorite, the macaron. A friend had ordered some macarons and wanted cookies and cream flavor, and who am I to say no? Who am I to not make an extra dozen to eat by myself in a dark room while Netflix plays softly in the background? So here we are, making macarons again. Honestly, they were fucking scary to make in the beginning, but the more you make them, the less intimidating they are, and they're still the same amount of delicious, so I say, give it try, folks! 
This recipe makes about 2 dozen small macarons. 

For the Shells:

1 part egg whites - 69 grams (2 egg whites for me- this is why I always go by weight, because sometimes 2 egg whites is 64 grams, so it is better just to weigh and change your weights accordingly)

1.25 part almond flour - 86 grams (69 from egg whites x 1.25)

0.8 part granulated sugar - 55 grams

1.5 part powdered sugar - 103 gram

0.3 part Oreo cookie crumbs (outside of Oreos crushed up) - 20 grams

1/8 tsp cream of tartar

1. In a stand mixer fitted with whisk attachment, start mixing egg whites. Don't mix them on too high of a speed (no higher than 6 on a kitchenaid). While this starts out, move to the second step.

2. Sift together almond flour, powdered sugar, and Oreo crumbs into a bowl. *I just put my bowl on my food scale and poured through my sifter until the right weight because I'm lazy.* Put aside until the egg whites are finished.

3. After the egg whites have started to foam up, add cream of tartar. *this is just to help stabilize the meringue, so you can leave it out if you want.

4. Start adding in the granulated sugar to the foamy egg whites a bit at a time. Let mixer keep whipping until you get to stiff peaks, like you see in the picture.

5. Pour in about half of your dry ingredients into the egg whites. You'd think you have to be gentle here because it's egg whites and you don't want to lose all that air. Nah. You can mix the shit of out of this; it's okay.

6. Pour the second half of dry ingredients in and keep mixing. Here I was a bit more gentle. You want to keep mixing until it looks glossy and it ribbons back on itself. You want the ribbon to homogenize and mix back into the mixture within about 20 seconds or less. 

7. Line baking sheet with silpat mat and/or parchment. *You will want to draw a circle template to pipe your macarons on to if you're using parchment;**You'll need at least two baking sheets with the parchment ***If you plan to make a lot of macarons, just invest in some mats. I bought mine on amazon for like 12 bucks for 2 mats. ****this is a lot of addendums, but I also just put the parchment on top of the silpats because they tend to come off of the parchment better, but I like that I can see the circles on the silpats. Okay, I'm done now.... 

8. Pour batter into a prepared piping bag with a large round tip. Pipe into the circles on your parchment of silpat. I just blop it in there; I don't make a circle motion, if that makes sense. 

9. Whack the cookie sheet on the counter at least 3 times to get all the air bubbles out. *Again, you can whack them on the counter pretty hard.

10. Allow to sit at room temperature until they look matte and when you try to gently touch them with your finger, they don't stick. They form a skin on top. This can take between 20 minutes to an hour (usually more like an hour). In more humid months, this will take longer, but it's one of the most important steps! *also put them away from the edge of the table if you have a dog ;)  

11. While you're waiting, preheat oven to 350F.

12. BEFORE you put them in the oven, drop to 325F. I would only bake one sheet at a time. I tried double once. It doesn't work out well. Anyway, bake for 12 - 14 minutes, but check at 10 minutes. If you can lightly touch it and the macaron doesn't move on it's base, it should be done.

13. Allow to cool completely before trying to remove from the sheet and fill.


For the Buttercream:

4 tbsp (1/2 stick) unsalted butter, room temperature

Insides of 15 regular Oreos *it would behoove you to get double stuffed so you don't have to scrape as many cookies.

1/2 c powdered sugar

2 tbsp Oreo crumbs *sift these so that you don't have big clumps stopping up your piping tip later

Splash of vanilla

Pinch of salt

1. In a stand mixer fitted with a paddle attachment, put in butter and Oreo innards. Slowly add powdered sugar and Oreo crumbs into the butter.

2. Add vanilla and salt into the mix. Check for taste. If you feel like it needs a bit more powdered sugar, this is a good time to add it, and if it feels too thick, you can add a splash of cream or milk if you feel so inclined; I did not.

Assembly:
1. Put buttercream in a piping bag with a round tip *or any tip really- you do you, boo.

2. Pipe a dollop of cream on half the shells- a little goes a long way. 

3. Put the other half of the shells on top of the buttercreamed shells.

4. Most recipes say to store in the fridge; I don't like this, so I don't do it. It's buttercream, so, pretty shelf-stable. I just store them in an air-tight container on the counter. They may last longer if you put them in fridge, but eating them before they go bad has never been an issue for me!


Monday, August 10, 2020

Pecan Pie Cupcakes

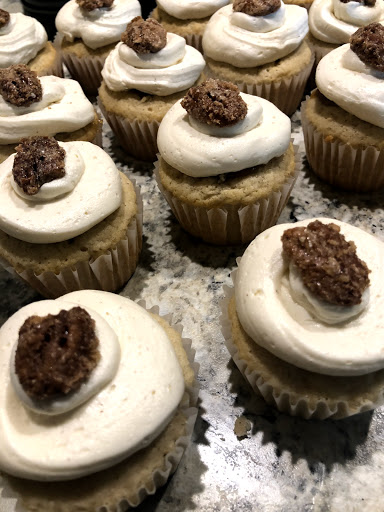
I made these babies for my birthday. Yes, I realize my birthday is in August, and pecan pie is so not a summery dessert,but you know what, it was like 70 degrees, and felt like Fall, and I do what I want, so come at me. Anyway these were everything I wanted them to be. They are a spiced cupcake filled with pecan pie filling, topped with cinnamon buttercream and a candied pecan. I'm drooling just thinking about them again. This recipe makes 24 cupcakes and a little extra (or three 9inch round cakes). 

For the candied pecans:

I used this recipe and just tweaked a bit (and halved it because I didn't need so many)

1 egg white

1 tbsp water

1/2 c granulated sugar

1/2 tsp salt

1/2 tsp cinnamon

splash of vanilla

pinch of cardamom 

2 cups halved pecans

1. Preheat oven to 225F. Prepare baking sheet with parchment paper. In a large bowl, beat egg white, vanilla, and water until frothy. Add pecans and stir to coat. 

2. In a separate bowl, combine sugar, salt, cinnamon, and cardamom. Pour over pecans and stir to coat. 

3. Pour pecans onto prepared baking sheet and bake for one hour, stirring every 15 minutes. Allow to cool completely before snacking (and placing on cupcakes). *I made these the night before cupcakes, which was a good idea. 

For the batter:

1/2 c vegetable oil

1/2 c unsalted butter, room temp

2 c granulated sugar

3 eggs, separated

1 tsp vanilla extract

2 c all purpose flour

1 1/2 c cake flour 

1 tsp salt

1 1/2 tsp baking soda

1 1/2 tsp baking powder

3/4 tsp cinnamon

1/4 tsp ground cloves

1/4 tsp ground ginger

1 1/2 c buttermilk

1.Preheat oven to 350F and prepare cupcake pans with liners and grease a small (I usually do 6 in) pan for the extra batter.
2. In a stand mixer fitted with paddle attachment, cream together oil, butter, and sugar. Add in the yolks of the three eggs- keep the whites separate. Add in vanilla extract.
3. In a small bowl, whisk together egg whites until at stiff peaks. Set aside.
4. In a separate bowl, combine all dry ingredients- flour, baking powder, baking soda, salt, and spices.
5. Pour 1/3 of the dry ingredients into the sugar mixture and mix to combine.
6. Pour 1/2 of the buttermilk into sugar mixture and combine.
7. Pour another 1/3 of dry.
8. Pour second 1/2 of buttermilk.
9. Pour in the last 1/3 of the dry ingredients.
10. Slowly fold in the egg whites that were whipped up earlier. *This ensures that the batter will be light and fluffy.


11. Distribute into pans and bake for 18 - 22 minutes or until a toothpick inserted comes out clean.

For the filling:

I used this recipe for the filling; it will make more than you need for the cupcakes, but I say you still want to make this amount, and then you can stick it in a jar and eat it with a spoon, like I did. 

3 eggs

3/4 c dark corn syrup *I used light corn syrup, and it was fine

3/4 c dark brown sugar

1 tsp vanilla extract

1/4 c unsalted butter, cubed

1/2 tsp salt

2 c chopped pecans

1. Combine all ingredients into a saucepan except the pecans. Heat over medium heat until it starts to boil, stirring constantly. 

2. Add the pecans and boil for another 30 seconds or so. 

3. Remove from heat and allow the mixture to cool. *You can stick it in the fridge if you want it to cool faster. 

Ask me how many times I "tasted" this for quality testing....

For the buttercream:

2 c unsalted butter, room temp (4 sticks)

5 1/2 (ish) cups of powdered sugar

Splash of milk or cream (optional)

1 tsp vanilla 

1/2 tsp cinnamon 

Pinch of salt

1. Put butter in a stand mixer fitted with paddle attachment and start to add in powdered sugar slowly to incorporate. 

2. Add in vanilla, cinnamon, and salt. Whip for a few minutes until light and fluffy. If it's too thick, you can add a splash of milk. 

3. Put in a pastry bag with your desired tip. 

Assembly:

1. Take the cooled cupcakes and hull out the center, making sure to not go all the way to the bottom. 

2. Spoon in some of the pecan pie filling. 

3. Pipe some buttercream on to the cupcakes. 

4. Top with a candied pecan. 

5. Pretend like it's Thanksgiving and wear your stretchy pants. 


Gluten Free Brownies

This recipe is riffing off of a flourless chocolate cake recipe I have used in the past. So, like duh, it's already, gluten free, but I ...