Saturday, February 20, 2021

Pina Colada Cupcakes


My friend, Liz whom I've talked about before, made me homemade pineapple preserves, which made me obviously want to make cupcakes and top them with a rum buttercream and some toasted coconut. Isn't that where your mind goes immediately? I thought so. Also, there's about 10 inches of snow on the ground, and I needed a little fucking summer. This recipe makes about 3 dozen cupcakes or three 9in cake pans. 


For the Cupcakes

1/2 c vegetable oil

1/2 c (1 stick) unsalted butter, room temp

2 c granulated sugar

3 eggs, separated

1 tsp vanilla extract

1 1/2 c cake flour

2 c all purpose flour

1 tsp salt

1 1/2 tsp baking powder

1 1/2 tsp baking soda

1 c buttermilk

1/2 c pineapple juice

1 c chopped pineapple (I had pineapple slices, so I just chopped those).

1. Preheat oven to 375 F and prepare cake molds or cupcake tins. 

2. In two bowls, separate eggs and whisk the egg whites to medium peaks. Set aside. 

3. In a stand mixer fitted with paddle attachment, cream together oil, butter, and sugar. 

4. Add in eggs yolks one at a time until incorporated. Then add the vanilla. 

5. Mix together dry ingredients in a separate bowl. In another measuring cup, combine buttermilk and pineapple juice.

6. Add 1/3 of the dry ingredients to sugar mixture. 

7. Add in 1/2 of the wet ingredients.

8. Repeat with another 1/3 of dry, second 1/2of wet, and finish with the last 1/3 of dry. 

9. Gently fold the egg whites into the batter and fully incorporate. Once combined, add in the pineapple chunks and incorporate. 

10. Divide into your cake/cupcake tins. If you are making cupcakes, it's about 15 - 18 minutes in the oven. For cake, it's about 18 - 22 minutes. 

11. Allow to cool before filling. 

For the Buttercream

1/2 c dark rum

4 sticks unsalted butter, room temp

6 c powdered sugar

Pinch of salt

Splash of vanilla

*optional* splash of milk or heavy cream- I'm not gonna lie, I wanted more rum flavor, so I loosened with rum- this rum did NOT have the alcohol cooked out of it, so just keep that in mind (but it is miniscule).

1. Reduce the dark rum in a small pan on the stovetop until it's about 1/8 cup and allow to cool.*Beware of the vapors- girl, I felt like Scarlett O'Hara. 

2. In a stand mixer fitted with paddle attachment, beat butter and slowly incorporate powdered sugar, salt, rum, and vanilla extract. 

3. If it feels too thick, you can add a splash of milk or cream to loosen it a bit. 

Assembly 

You will also need:

Pineapple preserves (If you don't have a friend who makes it by hand, store-bought is fine.)

2/3 c coconut flakes (I used sweetened)

1. Toast the coconut on the stove top for a few minutes. Make sure to babysit it, because this shit will burn real quick. Allow to cool.

2. With a serrated knife, cut a hole into each cupcake, and fill with the pineapple preserves. 

3. Top with the rum buttercream. 

4. Add coconut flakes on top.

5. Make a real drink and enjoy together.

**IF you made a cake instead, this is what I would do:

1. Place first cake down. Add some buttercream, and with a piping bag, pipe around the top of the cake so that you have a dam. Add some pineapple preserves and coconut flakes. Repeat.  


Tuesday, February 16, 2021

Red Velvet Cupcakes


I am just gonna say it. I'm not a huge fan of red velvet. It's like it tries to be a chocolate cupcake but just can't quite make it. Now, I will say, I AM a huge fan of cream cheese frosting, so that helps red velvet's case in my eyes. I have been playing with this recipe for a while because I wanted it to be chocolatier but kept running into the issue of the extra cocoa powder muddying my color. So this is where I'm at now- I have found a pretty good balance of color and flavor. And besides, you HAVE to have red velvet for Valentine's Day.
This recipe makes three 9x9 inch cake rounds or about 3 dozen cupcakes.


For the Cupcakes:

1/2 c vegetable oil

1/2 c (1 stick) unsalted butter, room temp

2 c granulated sugar

3 eggs, separated

1 tsp vanilla extract

2 c all purpose flour

1 1/4 c cake flour

1/4 c cocoa powder *I bought this "red cocoa"- it helped a little, but I don't know that it is worth the money. If you want to use a little less cocoa (like 2 tbsp) instead of this expensive cocoa, do it. I've done it. 

1 tsp salt

1 1/2 tsp baking powder

1 1/2 tsp baking soda

1 1/2 c buttermilk

1 tbsp vinegar

red food coloring (I don't really have a measurement for this- keep putting it in until you get a color you like- it will darken in the oven a bit. I used 1 oz or a little more)

1. Preheat oven to 375 F and prepare cake molds or cupcake tins. 

2. In two bowls, separate eggs and whisk the egg whites to medium peaks. Add some food coloring into this as well. Set aside. 

3. In a stand mixer fitted with paddle attachment, cream together oil, butter, and sugar. 

4. Add in eggs yolks one at a time until incorporated. Then add the vanilla. 

5. Mix together dry ingredients in a separate bowl. 

6. Add 1/3 of the dry ingredients to sugar mixture. 

7. Add in the vinegar, some red food coloring, and about half of the buttermilk. 

8. Repeat with another 1/3 of dry, second 1/2of buttermilk, and finish with the last 1/3 of dry. 

9. Gently fold the egg whites (or egg reds now ;) into the batter and fully incorporate. 

10. Divide into your cake/cupcake tins. If you are making cupcakes, it's about 15 - 18 minutes in the oven. For cake, it's about 18 - 22 minutes. 

11. Allow to cool before frosting.

For the Frosting:

2 (8 oz) boxes cream cheese, room temp

2 sticks unsalted butter, room temp

5 (ish) c powdered sugar

Splash of vanilla

Pinch of salt

*splash of heavy cream or milk- If it feels too thick, I like to add a bit of milk or cream to smooth out.

1. Put butter and cream cheese in stand mixer and mix to combine. 

2. Gradually incorporate the powdered sugar. 

3. Add vanilla and salt. 

4. Add a splash of heavy cream or milk if you want. 

5. Load up those cupcakes with delicious cream cheese frosting! *You will want to keep these in the fridge because of the cream cheese. I suggest taking them out about 20 - 30 minutes before eating so they can warm up a bit.  


Saturday, February 6, 2021

Mini Pop Tarts


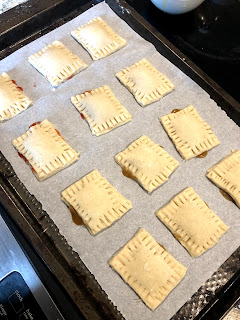
Still following the 52 weeks of baking challenge on Reddit, and this week is "bite-sized", so I made some mini pop tarts! These don't really taste like store bought pop tarts, but that's not really a bad thing is it? Plus, they're super easy to make. This recipe makes about 18 mini pop tarts (2 in X 2.5 in). 

For the crust:

2 c all-purpose flour

1 tsp salt

1 tbsp granulated sugar

1/2 tsp cardamom *optional*

2/3 c unsalted butter, cold

1/3 c *ish* heavy cream (or milk is fine here too)

1 tbsp white vinegar

1 egg (for the egg wash when assembling)

1. Preheat oven to 425F and line two baking sheets with parchment paper.

2. Combine flour, salt, sugar, and cardamom in a bowl. Using a cheese grater, grate in the butter and then incorporate with a pastry cutter until you have pea-sized pieces of butter throughout the mixture. *You can also do this in a food processor. I have a baby food processor, so here we are, doing it old school. 

3. Add vinegar and stir to incorporate. 

4. Add heavy cream in a bit at a time, mixing as you go, until the dough starts to come together. For me, I made these in February. It's dry. I added a good amount more of the heavy cream this time. 

5. Turn out onto a clean surface and form into a ball. Wrap in plastic wrap and allow to to chill in the fridge for about 30 minutes. *I'm gonna be honest; I didn't chill it this time because I wanted pop tarts stat, and it was fine, so follow your heart.  

For the fillings:

*I did three different fillings because I wanted to try out a couple of different options. 

Strawberry jam *I used store bought. I'm not Ina. I can do that. 

Nutella *Again, store bought. Come at me. 

Brown sugar mixture:

1. Place 2 tbsp butter in a bowl and melt in microwave. 

2. Add a pinch of salt and about 1/2 - 3/4 c brown sugar. *I'm not gonna lie, I didn't measure how much brown sugar. You want it to be pretty thick. We are trying to prevent it from just straight up running out off the pie crust. 

Assembly:

1. Roll out the pie crust dough to about 1/8 inch thick. Cut into rectangles (like I said, I did 2 inch x 2.5 inch). I DID also re-roll out the jagged edges again to get more rectangles, and it was fine. 

2. Place half of your rectangles onto the parchment lined baking sheets. 

3. Take one spoonful of your desired filling and put it in the middle of each square. *You don't want to over fill here. It will all come out the sides if you do. Ask me how I know... 

4. Crack the egg in a small bowl and mix it with a splash of water to make an egg wash. 

5. Take another rectangle and brush the edges of it with egg wash. Place that side down on top of a rectangle with filling. You're making a glue for the two crust pieces to stick together. 

6. Use a fork to crimp the edges so that the crust stays together. *I tried the first one without the egg wash, and it didn't hold well, so the egg wash is a must. 

7. Once all assembled, brush the tops of each tart with egg wash. 

8. Bake at 425F for about 20 - 25 minutes or until golden brown. 

9. Allow to cool before glazing. 

For the glaze:

1/4 c heavy cream or milk 

1/2 c powdered sugar, sifted *again, I didn't really measure these. We are making a glaze. We measure with our hearts (and our eyes). 

Pinch of salt

Splash of vanilla extract

1. Pour heavy cream and vanilla extract into a bowl. 

2. Sift in the powdered sugar and add the pinch of salt. Stir to combine. If it's too thin, add more powdered sugar. If it's too thick, add more heavy cream. I wanted a THICK paste that I could slather on with an off-set spatula instead of a dunking situation. See below. 

3. Once tarts are cooled, slather with glaze and add sprinkles or sanding sugar.