This is a twist on a recipe from an Indigenous cookbook called "Seed to Plate, Soil to Sky" our friend group cooked out of for Cookbook club once. ALL of the recipes we tried out of it were great. As we all know, I am not great at following recipes, so I am going to put in my adjustments here. Since cooking this the first time, I have had it requested for multiple parties. This torte always takes the cake (pun intended).
For the crust:
1 1/2 c pecan pieces
1/2 c of almond flour
1/4 c brown sugar
1 tsp cinnamon
1/2 tsp salt
1/4 c melted butter (half a stick) *can sub for an oil if you need it to be dairy-free as well
1. Preheat oven to 350F and get out a tart (or pie) pan.
2. In a food processor, pulse the pecans, almond flour, sugar, cinnamon, and salt together.
3. Add the melted butter and pulse again.
4. Transfer the mixture to your pan and press it down evenly into the bottom and up the sides of your pan.
5. Bake for 15 minutes or until the crust is lightly golden. Remove from oven and let it cool while you make the filling.
For the filling:
13 1/2 oz full fat coconut milk (shake well before opening)
1/2 c granulated sugar
1/4 c melted butter *same here- can sub for an oil if needed
1 tsp vanilla extract (measure with your heart)
Pinch of salt (this is really to taste, so feel free to taste and adjust)
10 oz dark chocolate
1. In a medium saucepan, bring the coconut milk, brown sugar, and butter to a boil.
2. Put the chocolate, vanilla extract, and salt into a bowl, and once mixture is boiling, pour it over the chocolate and let sit for about 5 minutes.
3. Whisk until fully combined and let cool to room temp.
4. Pour mixture over the crust and refrigerate uncovered for at least 4 hours, but I pretty much always do overnight.
This recipe is riffing off of a flourless chocolate cake recipe I have used in the past. So, like duh, it's already, gluten free, but I also can't do egg whites, so here we are, adjusting the recipe to my persnickety body. This recipe is chocolatey, gooey, and has a crackly top, so in my book, that makes for a delicious brownie! It makes an 8x8 pan of brownies.
For the Brownies:
12 oz dark chocolate chips
7 tbsp unsalted butter
5 egg yolks
1 c granulated sugar
1/4 c brown sugar
3/4 c pumpkin puree OR unsweetened applesauce
1 tsp vanilla
1/4 tsp salt
1/4 c cocoa powder
1 tsp Xantham gum (this and the pumpkin/applesauce are what act as binders in place of the egg whites)
1. Preheat oven to 350F and prep pan with parchment paper (overhang a bit so you can easily lift out of the pan) and non-stick cooking spray.
2. Put 10 oz of the chocolate, brown sugar, and cocoa powder in a heat-safe bowl and set aside while you brown the butter.
3. In a small pan, melt the butter and continue to stir until it starts to smell nutty and there are little bits of brown in the butter. Once browned, pour over the chocolate and sugar mixture, stirring until fully melted, and set aside.
3. In a stand mixer fitted with whisk attachment, combine egg yolks and sugar and mix until light in color.
4. Add in the pumpkin puree (or applesauce), vanilla, and salt. Mix to combine.
5. Add in the chocolate/butter mixture until combined.
6. Add in Xantham Gum and mix to combine.
7. Mix in the remaining 2 oz of chocolate chips and pour batter into prepared pan.
8. Bake for about 55-60 minutes or until a toothpick in the center comes out mostly clean. *This is a gooey brownie, so a little on the toothpick is to be expected.* Also when it first comes out it doesn't look super crackly (see picture below), but once you cut into it, the top crackles delightfully.
9. Allow to cool completely before cutting. Serve with your fav ice cream!
I haven't posted for quite a while, and part of that is because I was diagnosed with Hashimoto's (an auto-immune disease), and have been on a very restricted diet for the past year. As I have reintroduced foods and found out what works and doesn't work for me, I have been struggling with my baking journey. I definitely can't do gluten anymore. Dairy is a bit iffy as well... and egg whites are a negativo. Not to mention that common substitutes for some of these things (like rice flour and aquafaba) also don't sit well with me. All of this to say that shit's fucked, and I am trying to play around with some of my old recipes (and make some new ones) that I CAN eat. It's been a challenge, as I don't know the ingredients and what how they interact together like I did my regular ingredients. Anyway, in true Bravely Baking fashion, I thought, well let's start documenting recipes that DO work for me- and maybe they will work for you too. This is a riff on my dairy free lemon coconut shortbreads- so now they are also GF. This recipe makes about 24 cookies (more or less depending on your cookie cutter size).
For the Cookies:
1/2 c granulated sugar
1 c coconut oil
Zest and juice of 1 lemon
1 tsp vanilla extract
1 1/4 c coconut flour
1/3 c arrowroot starch
2 tbsp gelatin (so these are NOT vegan; just GF- could sub a vegan gelatin sub like Agar Agar probably just fine)
1 tsp baking soda
1/2 c sweetened coconut flakes, toasted
1/4 tsp salt
1. Preheat oven to 350F and toast your coconut flakes in a pan on the stove top- you can do it in the oven, but let me tell you how many times I've burned it this way. Allow coconut flakes to cool while you continue on.
2. Put sugar and coconut oil into a stand mixer fitted with paddle attachment and mix to combine.
3. Add vanilla extract, lemon zest, and juice. Mix to combine.
4. Combine dry ingredients (not the coconut flakes yet) into the wet batter and mix. You're looking for wet sand consistency. You want it to be a little crumbly, but hold together when you squeeze it in your hand.
5. Add in coconut flakes.
6. Dust a clean surface with some additional coconut flour and turn the dough out onto the surface. Work the dough until it just comes together into a ball.
7. Flour a rolling pin as well and roll out the dough to about 1/4 inch thick or so. Cut using the cookie cutter of your choice.
8. Bake for 8 - 10 minutes. These baked off much faster than my gluten cookies, so keep an eye. Also cautionary tale- I wouldn't use parchment paper on your baking sheet. I tried one batch like that, and they didn't crisp up as much.
9. While cooling, work on the glaze.
For the Glaze:
Juice of 3 lemons
1 1/2 c (ish) powdered sugar, sifted
1. Put lemon juice into a bowl.
2. Whisk in the sifted powdered sugar until you get the consistency you want. I'd say you want it a little thick so that you can dunk the cookies into the glaze and it doesn't just slide off. If it's too thin, add more powdered sugar; too thick, add more juice (or even water is fine).
3. These require a double dip for sure. I dipped them once (like I would the regular cookies), and these little babies just soaked up all of that glaze straight up. I was worried about them being soggy, but they totally weren't- so do the double dip. Just allow to set up a bit between dippings.
4. These are good the first day, but honestly, SO much better the second day once the cookie and the glaze have really had a chance to be friends.
Let me know if you have any tips for me as I am on this new journey!
These little babies will steal the show at any holiday party! And I know what you're gonna say, but Jenna, macarons are a bitch to make, and I'll never be able to do it! I will agree, that sometimes she's a little persnickety, but if you treat her right, she'll treat you right. So let's get into how to make that happen!
This recipe makes 24-30 small macarons.
For the Macaron Shells: *This is by weight, and yes, you HAVE to weigh it 1 part egg whites - 64 grams (2 egg whites for me) 1.5 part almond flour - 96 grams (64 from egg whites x 1.5) 0.8 part granulated sugar - 51 grams 1.5 part powdered sugar - 96 grams Green food coloring 1/8 tsp cream of tartar 1 or 2 drops of peppermint extract (this shit is STRONG, and you will add more into the buttercream, so caution here)
**White chocolate optional for decorations.
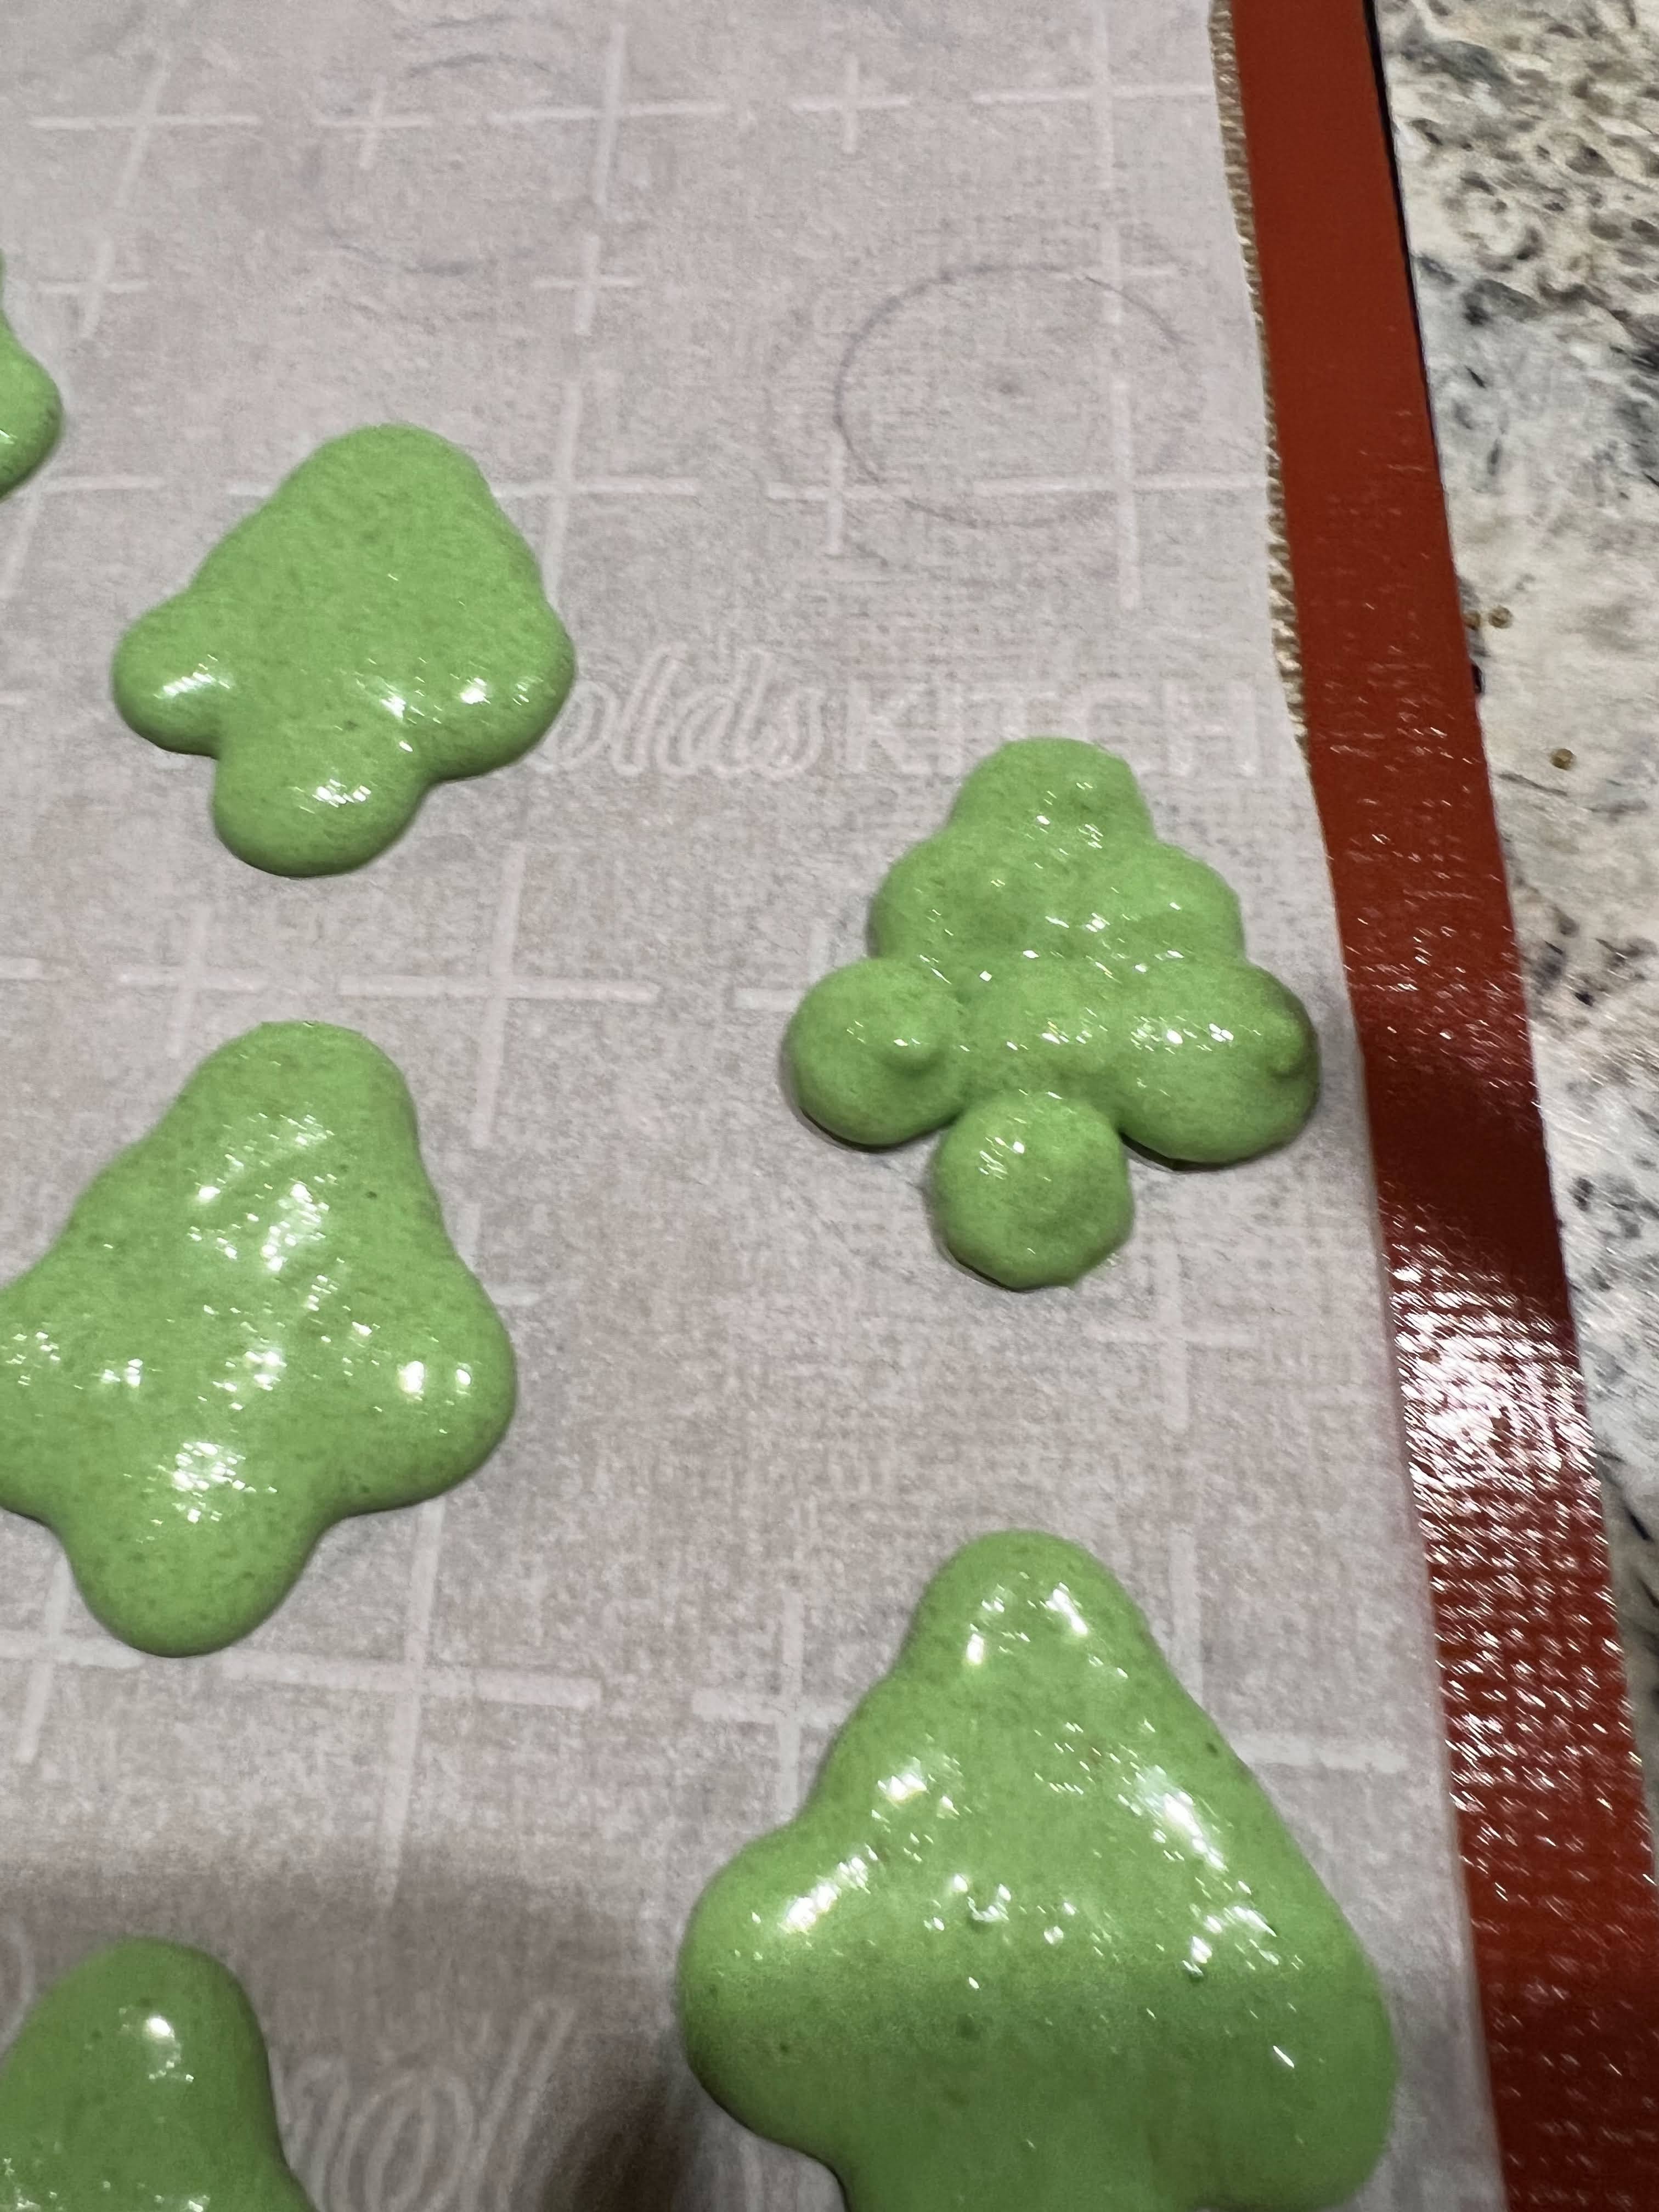
1. Prepare two cookie sheets with a silicon mat or parchment paper with circles (or in this case Christmas trees) marked out in pencil (if you do this, obviously flip the parchment over so that you aren't piping into pencil marks). Also prepare a piping bag with large round tip (or just put a whole in the tip of the bag).
2. In a stand mixer fitted with whisk attachment, start mixing egg whites. Don't mix them on too high of a speed (no higher than 6 on a kitchenaid). While this starts out, move to the next step.
3. Sift together almond flour, powdered sugar in a bowl. *I just put my bowl on my food scale and poured through my sifter until the right weight because I'm lazy.* Put aside until the egg whites are finished.
4. After the egg whites have started to foam up, add cream of tartar. *this is just to help stabilize the merengue, so you can leave it out if you want.
5. Start adding in the granulated sugar to the foamy egg whites a bit at a time. Let mixer keep whipping until you get to stiff peaks, like you see in the picture.
6. Take the bowl off of the stand mixer- we are going by hand for the rest of this. Pour in about half of your dry ingredients into the egg whites, the drops of peppermint extract, and the green food coloring. You'd think you have to be gentle here because it's egg whites and you don't want to lose all that air. Nah. You can mix the shit of out of this; it's okay.
7. Pour the second half of dry ingredients in and keep mixing. Here you can be a bit more gentle. You want to keep mixing until it looks glossy and it ribbons back on itself. You're looking for the batter to incorporate back into itself within about 15-20 seconds. When I think I'm done, I always do a few more stirs to make sure.
8. Once ready, pour batter into the piping bag and pipe out circle macarons or you can try your hand at the tree. As you can see below, I just did little circles close together 1-2-3-1 down the line.
9. Make sure to bang the tray on the counter several times to get the air bubbles out and allow to cure for about 30 minutes or so (this time can vary wildly- you're looking for the surface to be matte instead of shiny, and when you touch it, it doesn't stick to your finger.
10. Once you pipe, this is a great time to preheat the oven to 350F. BEFORE you put them in the oven, drop to 325F. I would only bake one sheet at a time. I tried double once. It doesn't work out well. Anyway, bake for 10-12 minutes. If you can lightly touch it and the macaron doesn't move on it's base, it should be done.
11. Once cool to the touch, melt white chocolate in a bowl in the microwave at 15 second intervals until smooth. Place in a piping bag and cut a SMALL hole at the tip. Pipe any designs you want on the trees (you can decorate just one or both sides) and allow to cool completely before filling with the buttercream.
For the buttercream:
5 tbsp unsalted butter, room temp 3/4 c powdered sugar 1/8 c cocoa powder A few drops of peppermint extract 1/2 tsp vanilla extract A pinch of salt (to taste)
1. In a stand mixer fitted with a paddle attachment, put in butter. Slowly add powdered sugar and cocoa powder into the butter.
2. Add peppermint extract, vanilla, and salt into the mix. Check for taste and consistency- if it feels too thick, add a splash of milk or heavy cream.
Assembly:
1. Put the buttercream in a piping bag and cut the tip off.
2. Try to match up the macaron sizes beforehand so that you know which trees will fit as closely together as possible.
3. Pipe buttercream onto one macaron shell and sandwich them together.
4. Store in an air-tight container (on the counter or in the fridge is fine- they'll last longer in the fridge though).
I've been in a little rut with baking lately, and really this isn't even baking (just some cooking), but it felt good to get into the kitchen and make something that feels festive and easy! These individual desserts start with a graham cracker crumb, cranberry compote infused with rosemary, and a decadent white chocolate mousse to top it off.
This recipe makes 6-7 ramekins (or whatever glassware you choose to make it in). In fact, I think the more different glasses or tea cups you use, the better! This is also a pretty easy recipe that has a few different parts, AKA it's perfect to do with some helping hands (even if those helping hands aren't very kitchen savvy).
For the cranberry compote:
12 oz fresh cranberries (reserve a few for the garnish later)
1 orange, juice and zest
1 tsp fresh rosemary, chopped
1/2 c granulated sugar
1. Ready 6-7 glasses, jars, ramekins, tea cups, whatever you like. I just put them on a baking sheet so they're easier to transfer to the fridge later for chilling.
2. Now let's start with the cranberry compote because it will need to cool a bit before assembly. Combine all ingredients in a medium saucepan over medium heat.
3. Bring to a simmer and allow to cook for 10-15 minutes until the cranberries have burst and the compote thickens.
4. Remove from heat and allow to cool before assembly (I popped it in the fridge to speed up this process).
For the graham cracker crust:
1 sleeve (8 crackers) of graham crackers, crushed
6 tbsp unsalted butter, melted
1 tbsp brown sugar
Pinch of salt
1. Combine all ingredients into a large bowl until it resembles wet sand.
2. Gently press into the ramekins/jars to create a crust. I used the back of a measuring cup to push it down. Set aside for later.
For the white chocolate mousse:
2 c heavy whipping cream
1 c white chocolate chips (or chopped)
Pinch of salt
1 tsp vanilla extract
1. In a small heat-proof bowl, combine white chocolate, salt, and 1/2 c of the heavy whipping cream.
2. Melt in the microwave at 15 second intervals, stirring after each 15 seconds until white chocolate is fully melted (you don't want to over-heat this, so you know, gentle touches).
3. It will look like it's not going to come together, but it will. Whisk until fully combined, and add the vanilla extract. Set aside until the mixture comes to room temperature.
4. While that's cooling, pop the bowl of your stand mixer into the freezer to chill.
5. Once the chocolate is cooled, set it aside and grab the bowl from the freezer. Add in the remaining 1 1/2 c heavy whipping cream and whip on high until you reach stiff peaks.
6. Slowly stream in the white chocolate mixture until combined.
Assembly:
1. Grab the prepared glasses with graham cracker crust and equally divide the cranberry compote among them. Smooth into a layer (this is where a clear glass is fun because you can see the layers).
2. Top each glass with the white chocolate mousse. Pop into the fridge for several hours to firm up (at least three hours, but you can definitely make this a day beforehand as well and leave it to set up overnight).
Garnish:
1/4 c granulated sugar
1/4 c water
10 (ish) cranberries (reserved from earlier)
Extra granulated sugar for dusting
1. While you patiently wait for the mousse to be ready, you can make the garnish. In a small saucepan, combine the sugar and water until dissolved.
2. Throw the cranberries in and cook for a minute or two. Pull them out and throw them into a small bowl of granulated sugar just to coat (they're VERY sticky).
3. Allow to cool and harden completely. I'd hold off on topping until you're about to serve so the cranberries don't bleed everywhere.
4. Also add some white chocolate shavings and a small sprig of rosemary if you want. I know, I know, no one is going to eat the rosemary sprig, but come at me. It's cute and festive. I do what I want.
5. Also, also, save that cranberry simple syrup for some delicious cocktails!
You know those apple cider donuts that are coated in crunchy cinnamon sugar? Yeah, same vibe in a bundt cake. I don't really feel like I need to say more about this to get you on board. You're sold. Let's move on!
For the cake batter:
3 sticks unsalted butter, room temperature
1 c granulated sugar
1/2 c brown sugar
6 eggs
1 tsp vanilla extract
2 Granny Smith apples
2 c all-purpose flour
1 1/2 tsp salt
1 1/2 tsp baking powder
1 tsp cinnamon
1/4 tsp ground ginger
1/4 tsp ground cloves
1/4 c plain yogurt (Greek or regular, or even sour cream)
1/4 c apple cider
1. Prepare bundt pan with goop and preheat oven to 325F.
2. In a stand mixer fitted with paddle attachment, beat the butter and sugars together.
3. While those are creaming, in a separate bowl, grate the two apples on a box grater and set aside.
4. In the stand mixer, add in the eggs one at a time, incorporating fully before adding the next one.
5. In a small bowl, combine the dry ingredients (flour, salt, and spices). Pour 1/3 of the dry mix into the butter mixture.
6. Add in the yogurt.
7. Add second third of the dry ingredients.
8. Add the apple cider.
9. Finish with the last of the dry ingredients.
10. Fold in the grated apple.
11. Pour (I use this term loosely- she thick) batter into the prepared cake pan. Bake for about 50 - 60 minutes or until a toothpick inserted comes out clean.
12. Allow to cool slightly before turning out of the pan.
For the coating:
1/8 c unsalted butter, melted
1/4 c sugar
1/4 tsp cinnamon
1. In a small bowl, combine cinnamon and sugar.
2. Using a pastry brush, brush the entire cake with butter (I would recommend doing this in sections because that butter will soak into the cake, and we need it for sticking the sugar to).
3. Dust with the cinnamon sugar.
4. Allow to cool completely before eating. Might I suggest with a cup of coffee or some warm apple cider. Yeeees, it's all coming together my friends. Enjoy!
I have been on an old-school snacks kick for a while now, and these are the ultimate in throw back nostalgia. These couldn't be easier, but finding those damn rainbow candy coated chips is a bit of a bitch. I found them on Amazon. The sticker shock is real, but keep in mind that this bag will last you a long time, so if you feel like splurging, follow me down the rabbit hole.
This is my regular brownie batter, but made into a 13x9 pan, covered in chocolate ganache, and sprinkled with rainbow bliss.
For the Brownies:
1 stick unsalted butter
8 oz chocolate chips (you're really going to use the whole 12 oz bag, but 2/3 of it for now)
1/2 c brown sugar
1/2 c granulated sugar
3 eggs
1/2 c flour
1/4 c cocoa powder
1/4 tsp salt
1 tsp vanilla extract
4 oz chocolate chips for mixins (see, I told you)
1. Preheat oven to 375F. Prepare pan with some non-stick spray and parchment paper.
2. Put 8 oz chocolate chips and butter in a heat-safe bowl and microwave in 30 second intervals until chocolate and butter are just melted. Don't over-heat. If there's still a few lumps, just stir, and the residual heat will melt everything.
3. Add sugars to the melted chocolate mixture and combine. This will help cool the chocolate off a little before you add the eggs.
4. Add eggs one at a time and mix well before adding the next. Add vanilla.
5. Add flour, cocoa powder, and salt to the bowl and mix well to combine. Don't worry about over-mixing here.
6. Add in the remaining chocolate chips.
7. Bake for 25- 30 minutes or until a toothpick inserted comes out kind of clean. Allow to cool at least partially before moving to the ganache.
For the Ganache:
1/2 c heavy cream
6 oz semi-sweet chocolate chips
2 tbsp unsalted butter, room temp - I almost ALWAYS don't do room temp because I forget to pull the butter out for this; it's fine; just takes a few more mins to melt
Pinch of salt- this is soooooo necessary, so please make sure that you have enough
1 tsp vanilla extract
1. Place the heavy cream in a small pan on the stove and heat until just at a simmer. You don't want this to boil.
2. While the cream is heating, put your chocolate and butter chopped into small cubes into a heat safe bowl.
3. Once the cream has heated, pour over the chocolate and butter and cover bowl with plastic wrap for about 5 minutes. *This just ensures that your chocolate will melt and be easier to incorporate.
4. Stir the ingredients together. At first it will look like they aren't coming together. They will. Once it's smooth, I add some salt and vanilla to taste, and make sure to fully incorporate it.
5. Slather on top of the brownies and sprinkle the rainbow candy coated chocolate chips on top.
6. Allow to cool completely before cutting into pieces.
This is such an easy and delicious recipe. The hardest part is the name haha. These are a very warm and comforting cookie that can really have any add-ins you want. You don't have butterscotch? You got chocolate chips? Great! Toffee bits? Even better! The world is your oyster, baby, so let's play!
This recipe makes about 3 dozen cookies.
For the cookies:
1 c (2 sticks) unsalted butter
1 c brown sugar
2 eggs
1 tsp vanilla bean paste (or extract if you don't have it)
2 c all-purpose flour
1/2 tsp baking soda
3/4 tsp salt
6 oz butterscotch chips
1. In a small saucepan melt the butter and allow it to boil. Stir occasionally until the bubbles get small (and reduce in number), and the butter starts to get brown flecks in it. Put into a heat-safe container and allow to come to room temp before using. *you can throw in the fridge for a bit to speed this step along if you'd like.
2. Preheat oven to 350F.
3. In a stand mixer fitted with paddle attachment, cream together brown butter and sugar.
4. Add one egg at a time, mixing to incorporate. Add vanilla.
5. In a separate bowl, combine dry ingredients- flour, baking soda, and salt. Slowly add to the wet ingredients and mix to combine.
6. Fold in butterscotch chips.
7. Scoop onto baking sheet. Bake for about 8 -12 minutes. *I find that a little underdone is better than overdone.
I made this cake for a Memorial Day BBQ this past weekend, and I tell you what, this is gonna be my summer cake. This cake has all the things you love about a Pina Colada, including the rum!
For the Cake:
1 c shredded coconut, sweetened
3 sticks unsalted butter, room temp
1 c granulated sugar
1/2 c brown sugar
6 large eggs
1 3/4 c all-purpose flour
20 oz can crushed pineapple, drained (save the juice for the glaze)
1 1/2 tsp salt
1 1/2 tsp baking powder
1 tsp coconut extract *if you don't have this, you can use vanilla extract
1 oz white rum *you could use spiced rum if you don't have white rum
1. In a non-stick pan, put coconut on medium heat and lightly toast, stirring frequently. Do NOT walk away! She's fickle, and she'll burn in a heartbeat.
2. Once toasted, allow to cool for a bit. Reserve 1/4 c for the decoration.
3. Prepare bundt pan with goop and preheat oven to 325F.
4. Cream together butter and sugars in a stand mixer fitted with paddle attachment.
5. Slowly add in eggs, making sure to incorporate between each egg. Add in rum and coconut extract.
6. Combine dry ingredients in a small bowl (flour, salt, baking powder). Add them to butter and sugar slowly until incorporated.
7. Fold in the 3/4 cup of coconut and all the drained pineapple.
8. Bake for 45 - 60 minutes or until a toothpick inserted comes out clean.
9. Allow to cool most of the way before flipping out onto serving platter.
For the Glaze:
1 1/2 c (ish) powdered sugar
1/8 c (ish) reserved pineapple juice
1 tsp white rum
1 tbsp corn syrup
1. Combine all wet ingredients into a bowl.
2. Sift powdered sugar into wet ingredients and whisk to combine. You're looking for pourable, but still pretty thick so that it cascades down the sides but doesn't just soak right in.
3. If it feels too loose, add more powdered sugar. If it's too thick, add in more pineapple juice.
4. Pour over top of the cake and allow to fall down the sides. Top with reserved shredded coconut.
I live in the Saint Louis area, and Gooey Butter Cake runs through our veins. It's a right of passage, and I tried to make this like oh, ten years ago, and fucked it up, and never went back. Well, obviously that needed to change, so here we are again. She just keeps pulling me back in, but this time, it's just right.
This recipe is a little different than a traditional gooey butter cake because it has a shortbread crust instead of the cake mix layer, but honestly, I may prefer this. It makes a 9x13 of bars.
For the Shortbread:
1 c (2 sticks) unsalted butter, room temp
1/2 c granulated sugar
1 tsp vanilla bean paste (or if you don't have this you can use vanilla extract)
3/4 tsp salt
2 c all purpose flour
1. Preheat oven to 350F and prepare 9x13 with parchment paper (with some overhang to make it easier to pull out) and cooking spray.
2. Cream together butter and sugar. Add in vanilla bean paste and salt.
3. Slowly incorporate flour. This mixture will be sandy, but when you squeeze it together in your hand, it will clump.
4. Pour into prepared pan and press down with hands or the back of a flat measuring cup.
5. Bake for 15 minutes, and while it's baking, prepare filling.
For the Gooey Butter:
8 oz cream cheese, room temp
1 stick unsalted butter, room temp
2 eggs
1/2 tsp salt
1 tsp vanilla bean paste
Zest of 1 lemon
4 cups powdered sugar
1. In a stand mixer fitted with paddle attachment, cream together cream cheese and butter.
2. Slowly incorporate the two eggs, vanilla, salt, and lemon zest.
3. Slowly incorporate the powdered sugar.
4. Whip together until fluffy.
4. After 15 minutes of baking the crust, pull it out and top with the gooey butter mixture.
5. Return to oven to bake for another 40 minutes or until the edges are browning but the inside still feels a little jiggly. It will be puffy, but once it is out, it will deflate some.
6. Allow to cool completely (for several hours) before dusting with powdered sugar and slicing into bars.