Tuesday, March 26, 2019

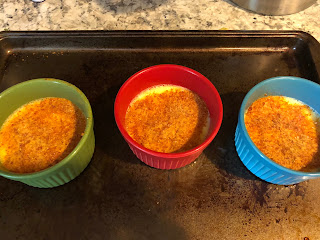
Creme Brulee


There’s something so satisfying about a dessert being both elegant and meant to be broken. Sure, I’ll break through a layer of hard sugar to get to your gooey, luscious center. You had me at sugar. Anyway, this was a fun challenge. I didn’t have a kitchen torch, and I didn’t want to buy one, so I used Mary Berry’s recipe to create the crust. So, yes, you don’t need a torch to do this recipe. Should you maybe splurge and buy a torch? I don’t want to tell you how to live your life, but it would make it a lot easier. Did I need a torch later for my s’mores pie? Yes. Did I still not want to buy a torch because I’m cheap? Also, yes. So, if you’re cheap like me, I will show you how to still make a great crème brulee without the torch!  I used this recipe for the custard: https://www.cinnamonspiceandeverythingnice.com/how-to-make-classic-creme-brulee/
For the Custard:
1 ¾ c heavy cream
1 tsp vanilla extract
4 large egg yolks
¼ c sugar
1. Preheat the oven to 300F. Place 4 (5-6 oz) ramekins in a baking pan. *This is the second challenge that I’ve used those adorable ramekins for! That’s a buy that I totally don’t regret.
2. Fill a kettle and boil some water. *Or if you’re like me and don’t have a kettle, fill your coffee pot with water and let ‘er rip.
3. Meanwhile, heat the cream in a small saucepan over medium-high heat until it just comes to a simmer. Remove from heat. Let it cool for 5 – 10 minutes.
4. Add the egg yolks to a large bowl, preferably one with a spout, and use a fork to pick out any white spots- discard them. Add the sugar and whisk until combined.
5. Whisk in one ladle of cream to temper the eggs. Then whisk in two ladles of cream. Slowly add the rest of the cream to the eggs while whisking until well combined but not frothy.
6. Add the vanilla extract.
7. If you see any lumps, run it through a sieve to get any of the lumps out.
8. Divide the custard among the ramekins. Fill the pan with hot water coming halfway up the ramekins. *I put my baking pan with my ramekins IN the oven before trying to pour the water. I was afraid I would spill the water into ramekins in the moving process to the oven. This worked well for me.
9. Bake for 40 – 55 minutes until the custard is mostly set but still jiggly in the middle.
10. Remove from oven and take ramekins out of the water. Allow to cool on a baking rack for about 30 minutes. Then refrigerate until chilled (about 3 hours).


I used this recipe for the sugar topping sans torch: http://thegreatbritishbakeoff.co.uk/cappuccino-creme-brulees-judges-recipe/

Sugar Topping:
While the custard is cooling, start on the sugar topping. If you have a torch, you can just put some sugar on your chilled custard and torch it. If you don’t, Mary Berry says that this way is the best to ensure the crunchy texture if you are broiling it in the oven.
You literally just need sugar for this part of the recipe. Easy peasy.

100g granulated sugar (1/2 c)

1. Put the sugar in a stainless steel pan, and add a little water to dampen.
2. Set over medium heat, stirring gently until the sugar has melted completely.
Turn up the heat and cook without stirring until the sugar syrup has turned to a pale straw colored caramel. *I think I let mine go a bit too far. It was still fine, but just know that it goes faster than you think it will, or at least it did on my electric stove.
3. Pour the caramelized sugar on to a lined baking sheet and leave until cold and hard.
4. Break up the caramel into chunks, then blitz in a food processor into a fine powder.
5. Sprinkle the caramel sugar evenly over the chilled custard. Place the ramekins on a baking sheet.
6. Put your oven on broil. *Also, move the rack in your oven to the highest place while still being able to fit your ramekins in. I didn’t do this on the first ones, but I did on the last one (my husband was eating his later), and it helped immensely.
7. Place the ramekins on that top shelf in your oven. Broil until the sugar melts and gets dark. It should happen in 3 – 4 minutes. Be careful not to leave them in too long because you don’t want the sugar to burn, and you don’t want the custard to get warm again. *This happened a little when I did the first round. This video shows what happens:
8. When we made my husband’s with the rack moved, the sugar finished much more quickly and we got a crunchier top and a colder custard.
9. Cool briefly until the caramel sets up and serve.  


Rating (Scale 1 - 5):
Difficulty: 2
Amount of Time: 2
Awesomeness: 4

Tuesday, March 19, 2019

Banoffee Pie


Okay, this is a good one. Have you heard of a banoffee pie? It’s a pie with a graham cracker crust. Wait for it. It has bananas. Wait for it. How about whipped cream? You dying yet? Oh, and it’s smothered in a toffee caramel sauce. This is basically banana cream pie on steroids.
I apologize in advance for all the videos of cascading caramel. Just kidding. But seriously, this recipe does NOT require a lot of video instruction, but this thing was so delicious that we just kept recording. 
I used this recipe: https://www.cinnamonspiceandeverythingnice.com/banoffee-pie/?wprptest2=0

Crust:
9 oz graham crackers
8 tbsp butter, melted (1 stick)
*The recipe doesn’t call for this, but I always do just a little sprinkle of brown sugar in my graham cracker crusts. It adds a bit of sweetness and a little crunchy texture.

1. Preheat oven to 350F.
2. Line the bottom of a 9in springform pan (or deep dish pie pan) with parchment paper.
3. Blend the graham crackers in a food processor (or by hand), until finely ground. Combine with butter (and the sugar if you want).
4. Press the mixture into the bottom and up the sides of the pan. *I used a little measuring cup to make the sides smoother. The bottom and sides are a bit thick.
5. Bake for 8 minutes *or until golden brown and held together. 

Toffee Sauce:

½ c packed brown sugar (preferably dark)
1 (14 oz) can sweetened condensed milk
8 tbsp butter (1 stick) 

1. Combine sugar and 3 tbsp of water in a medium-heavy saucepan over medium-low heat until sugar dissolves.
2. Increase heat until sugar boils, without stirring, for 5 minutes.
3. Whisk in condensed milk and butter and continue whisking/stirring for 5 minutes or until the sauce thickens slightly.
4. Remove from heat and spread one cup of the sauce over the prepared crust, including the sides. *I did only a cup- Do more. I had so much for the top, and it was crazy. Also, when it’s on the top of the whipped cream, it pushes it down, so if you have more on the bottom and less on top, more structural integrity.
5. Refrigerate for about a ½ hour or until the caramel is semi-firm. Keep the remaining caramel sauce at room temperature. 


Filling:
1 ½ c heavy cream
5 medium bananas, ripe but firm

1. In a stand mixer, beat the heavy cream to soft peaks. *I also added a little vanilla because I think pretty much all whipped cream calls for vanilla. I will say you don’t need to add any sugar though- caramel, bananas, you know.
2. Thinly slice bananas and fold into whipped cream. *I also added a layer of bananas on top of the caramel before I added the whipped cream layer.  

3. Spoon into the pie crust and allow to refrigerate for 30 minutes. #billowybitch

4. Rewarm the leftover toffee sauce just til pourable and drizzle over top. Refrigerate for 30 minutes before serving. *See the chaos that ensues if you don’t put enough of the sauce on the bottom.

**Best eaten immediately or in a day or two. It’s prettier the first day. The second day, the caramel seeps into the cream and you’ll be like oh my god, it’s ruined! Is that curdled? What’s happening? It’s totally fine. I took a bullet for you and ate it still after the second day. Totally same flavor.


Rating (Scale 1 – 5)
Difficulty: 1
Amount of time: 2
Awesomeness: 5

Tuesday, March 12, 2019

Lemon Curd Tartlets


 Have I told you how much I love lemons? I’m pretty sure I have. Lemon desserts are my favorite. Maybe it’s because I was born in the summer. I have no idea, but I love them. That being said, I had never made my own lemon curd, which seemed a bit ridiculous at this point in my life. So, this challenge was all about the curd. The tartlets were just the purest form of shoveling the lemon curd into my face other than just eating it off of a spoon (which I also did- don’t judge. You’ll do it too, then you’ll be like, shit, Jenna, I’m sorry for judging).
You’ll want to make the curd first because it needs time to chill and set up. I used this recipe for the curd from the Queen, Ina: https://www.foodnetwork.com/recipes/ina-garten/lemon-curd-recipe-1941910
Lemon Curd:
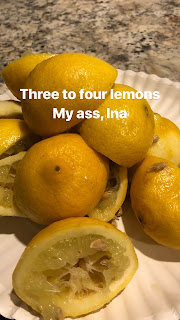
3 lemons *bullshit, Ina.
1 ½ c sugar
¼ pound unsalted butter, room temp (that’s 1 stick)
4 extra-large eggs
½ c lemon juice (3 – 4 lemons) *It took me like 6 lemons. Maybe it’s because my lemons weren’t harvested by virgins, but mine were not that juicy. Buy extra lemons. 
1/8 tsp salt


1. Using a vegetable peeler, remove the zest of 3 lemons, being careful to avoid the white pith. Put the zest in a food processor. Add the sugar and pulse until zest is very finely minced into the sugar.
2. Cream the butter and beat in the sugar and lemon mixture.
3. Add one egg at a time, and then add the lemon juice and salt. Mix until combined.
4. Pour mixture into a 2-quart saucepan and cook over low heat until thickened, about 10 minutes, stirring constantly. The lemon curd will thicken at about 170F, or just below a simmer. Remove from heat and cool or refrigerate. *Check with the back of a wooden spoon. If you can draw a line in the curd and it doesn't fall back together, it's good. I put it in a bowl with plastic wrap touching the top to avoid a film building on the top. Then I put it in the fridge.

I used this recipe for the tart shell: https://asideofsweet.com/lemon-tartlets-with-lemon-curd/
Tart Shell:
1 1/3 c all-purpose flour
1 stick cold, unsalted butter, cubed
¼ c granulated sugar
Pinch of salt
1 egg yolk *second bullshit of the day, folks. I ended up doing 2 egg yolks and a bit of heavy cream to make the dough stick together in a way that felt right to me. You want it to stick together like a pie crust dough.
1. Cut the butter into the flour until it resembles coarse breadcrumbs.
2. Stir in sugar, then add the egg yolk(s) until just combined. Use your hands to work the mixture into a dough.
3. Roll dough onto a floured surface.
4. Cut the pastry into rounds with a cookie cutter (or a cup because that’s what I had) and press into mini cupcake tins. Freeze for 30 minutes.
5. Bake at 350F for 20 minutes or until golden brown. Set aside to cool.
Assembly
1. I don’t feel like I need a whole section of this, but that’s fine.
2. Spoon or pipe the lemon curd into the cooled tart shells.
3. Top with a berry on top. I used blueberries.


Rating (Scale 1 - 5):
Difficulty: 2
Amount of Time: 1
Awesomeness: 5

Thursday, March 7, 2019

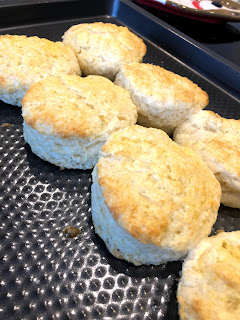
Buttermilk Biscuits

Biscuits. Have you ever met anyone who was like, "You know what I hate? Fluffy, flaky, buttery
biscuits." No, you haven't. Everyone loves biscuits. They're ubiquitous. Although you can find biscuits anywhere, I think most would agree that Southern biscuits are really what you want- biscuits with some heft, some tang, and so. much. butter.
I also want to say that biscuits are really fucking fast. Like start to finish, you can do it in 20 - 25 minutes. You can throw them together while you're making the rest of your dinner. Fresh biscuits. On a Tuesday. What's not to love? I made them the first time with this black bean soup that was to die for!
To prepare for this post, I did a lot of biscuit research. I will share some tips I have found about biscuit making as we go. I will also let you know about some delicious add-ins for biscuit bliss!
I used this recipe from Genius Kitchen

Here are two other websites that have good tips for biscuits:
Southern Living: 11 Ways you're Ruining your Biscuits
King Arthur Flour: Tips for Better Biscuits

Ingredients:
2 c all-purpose flour (plus more for dusting)
1/4 tsp baking soda
1 tbsp baking powder
1 tsp salt
6 tbsp unsalted butter, cold *I actually put my butter in the freezer the night before
1 c buttermilk (approximately) *Both times I have made this recipe so far, I've needed a bit more buttermilk, but I'm also making it in the middle of the winter. Maybe in the summer, with more humidity, this will change.

Directions:
1. Preheat oven to 450F.
2. Combine dry ingredients in a bowl.
3. Cut the butter into chunks and cut into the flour until it resembles a coarse meal. *Here's a tip- take out your frozen butter, and grate it on a cheese grater. Insta-coarse meal pieces of butter. So much easier to incorporate into the dry ingredients.


4. Add the buttermilk and mix JUST until combined. If it appears on the dry side, add a bit more buttermilk. It should be very wet.
5. Turn the dough out onto a floured surface.
6. Gently PAT the dough (do not use a rolling pin) until it's about 1/2 inch thick. *you want to handle this dough as little as possible.

7. Fold the dough about 5 times. *I folded, rotated, folded, rotated 5 times. I don't know that it matters, but it felt like a good thing to do.
8. Press down until about 1 inch thick. Use a round cutter to cut into rounds. You can knead the excess dough and cut again, but they won't be as good. *I didn't use a round cutter the first two times. I'm not having excess scraps- I'm using ALL my dough, thank you. I just cut them into squares. Rustic. But then the next time I was making breakfast sandwiches, and egg muffins and sausage patties fit better on a circle lol, so I get the appeal of both ways.
9. Place them on a baking sheet. If you like soft sides, place the biscuits touching each other. If you want them crusty on the sides, give them some room between. *I went for soft. Maybe I'll try the crusty sides next time. Or maybe I won't. The soft are delicious pillows.
10. Bake for 10 - 12 minutes until golden brown on top and bottom. *I baked a little longer than this. Also, the first time, I didn't put anything on top. They didn't brown on top very much. The second time, I put some of the buttermilk on top and a pinch of salt. They still didn't brown a whole lot on top. Next time, I am going to try an egg wash on top. This is more for the aesthetics. The flavor and texture is still good.


**The second time I made these, I was making pasta, so I added in some chives, garlic powder, and parmesan cheese. This was sooooooo good. It was like a lighter version of a cheddar bay biscuit. Shout out to Red Lobster. Seriously, how do you make those fucking biscuits?!? Anyway, to the ratings:

Rating (Scale 1 - 5)
Difficulty: 1
Amount of Time: 1
Awesomeness: 5


Tuesday, March 5, 2019

Mixed Berry Mille-Feuille


A Mille-Feuille is a French pastry with layers of puff pastry, pastry cream, and whatever else you want to put in it. This is delicious. Hard to eat, but tasty. I did a mixed berry Mille-Feuille, and it was kind of like a glorified toaster strudel. I don’t mean this in a bad way at all. I mean that in a nostalgic way.
Um, I didn’t completely use a recipe for this one, so I’ll try to explain what I did do.
Pastry Cream:
I used the recipe that I used for the pastry cream of my éclairs for the pastry cream of this recipe as well. Let’s start here because you need to prepare this in advance and allow time to cool. Here’s the recipe:
1 c whole milk

2/3 c heavy whipping cream

½ c granulated sugar

Pinch of salt

4 large egg yolks

½ c flour

4 tbsp unsalted butter, cold

1 vanilla bean *I didn’t use a vanilla bean, I used extract. I just put in the extract at the end, off of the heat so that it wouldn’t burn. 
1. In a medium heat-proof mixing bowl, whisk together egg yolks, salt, and sugar until completely combined and a bit frothy.
2. Add flour and set aside while heating milk.
3. Heat milk, heavy cream, butter, and vanilla bean (or don’t put in vanilla now if it’s extract) on the stove until simmering. Take off the heat when mixture starts to simmer *you don’t want it to boil.
4. Slowly add milk mixture into the egg yolk mixture, stirring constantly. Whisk well. *Be gentle- you don’t want to cook the eggs, so baby steps here, folks.
5. Return the mixture to the pan and bring to a simmer, stirring constantly. The mixture will thicken within a few minutes. Take off heat once it’s thick. *You’ll know when it’s thick. It like all of a sudden is like stirring wet concrete.
6. Cool to room temperature and transfer into a bowl with a lid to be refrigerated. It needs to cool at least four hours or overnight.

Preparing the Pastry:
1 box of prepared puff pastry *Yes, I used store-bought puff pastry because, as I said in my puff pastry post, you get one. One. Not doing that shit again. If you want to make your own puff pastry for this, see my puff post!
1. Preheat oven to 400F.
2. Cut along the creases of the puff so that there are three rectangles. *The “recipe” says to roll it out to 2-3 mm thick. I didn’t do this. It was fine. It also doesn’t tell you to cut until it’s out of the oven. That felt like folly to me, so I cut it before.
3. Transfer to a baking sheet lined with parchment paper. Prick all over with a fork.
4. Add another piece of parchment paper to the top, and place a second baking sheet on top of the dough. *this will not let the puff, well puff, too much. It keeps your layers of puff thin.
5. Bake for 15 – 20 minutes until golden. 
6. Allow to cool on a baking rack. *Take a minute to stare at it and let it know how loved he is. Oh puff, you have my heart. 


Mixed Berry Coulis:
½ c strawberries
½ c raspberries *You can do whatever kind of berries you want. I just had these, so that’s what I used.
½ c sugar
1 tbsp lemon juice
1. In a medium saucepan, combine the berries and sugar. Bring to a boil over medium heat. Let thicken for a few minutes.
2. Take off the heat and add lemon juice.
3. Blend the mixture, either with an immersion blender, or transfer to a blender. *If you’re putting it in a blender, be careful! This is hot liquid, so make sure you allow a place for the steam to vent.
4. Sieve to get out any seeds.
5. Put in the fridge until you’re ready to assemble.  

Icing:   
1 c powdered sugar
2 – 3 tbsp water
1. Is this really a recipe? No. Just combine until you get a consistency that you want. You want it to be runny, but also not drizzle all the way off your pastry.
*I also sub a little of the water for vanilla or even lemon would be good here because you have berries. You just need some kind of liquid, so you do you, boo.


Assembly:
1. Take cooled pastry cream, put in a pastry bag with any desired tip, or just a Ziploc bag with the corner cut off is fine.
2. Place one puff pastry rectangle onto a serving plate.
3. Pipe pastry cream onto the puff pastry. *You can do this however you want. You do want a pretty thick layer. I did big round dollops so that I could put berries in between or on top of them. For the bottom layer, I did raspberries in between the cream dollops.


4. Add another layer of puff pastry.
5. Again, pipe the cream onto the puff pastry. *For this layer, I did blueberries on top of the cream dollops.

6. Add the final layer of puff pastry.
7. Schmear the icing on top of the puff pastry. *I then added some drops of the coulis to the top for decoration and flavor.

8. Serve with extra icing and coulis if so desired. It’s desired, I promise.  *Godspeed trying to cut this bitch. That's the hard part. 

Rating (Scale 1 - 5):
Difficulty: 2
Amount of Time: 2 
Awesomeness: 4


Gluten Free Brownies

This recipe is riffing off of a flourless chocolate cake recipe I have used in the past. So, like duh, it's already, gluten free, but I ...