I live in the Saint Louis area, and Gooey Butter Cake runs through our veins. It's a right of passage, and I tried to make this like oh, ten years ago, and fucked it up, and never went back. Well, obviously that needed to change, so here we are again. She just keeps pulling me back in, but this time, it's just right.
This recipe is a little different than a traditional gooey butter cake because it has a shortbread crust instead of the cake mix layer, but honestly, I may prefer this. It makes a 9x13 of bars.
For the Shortbread:
1 c (2 sticks) unsalted butter, room temp
1/2 c granulated sugar
1 tsp vanilla bean paste (or if you don't have this you can use vanilla extract)
3/4 tsp salt
2 c all purpose flour
1. Preheat oven to 350F and prepare 9x13 with parchment paper (with some overhang to make it easier to pull out) and cooking spray.
2. Cream together butter and sugar. Add in vanilla bean paste and salt.
3. Slowly incorporate flour. This mixture will be sandy, but when you squeeze it together in your hand, it will clump.
4. Pour into prepared pan and press down with hands or the back of a flat measuring cup.
5. Bake for 15 minutes, and while it's baking, prepare filling.
For the Gooey Butter:
8 oz cream cheese, room temp
1 stick unsalted butter, room temp
2 eggs
1/2 tsp salt
1 tsp vanilla bean paste
Zest of 1 lemon
4 cups powdered sugar
1. In a stand mixer fitted with paddle attachment, cream together cream cheese and butter.
2. Slowly incorporate the two eggs, vanilla, salt, and lemon zest.
3. Slowly incorporate the powdered sugar.
4. Whip together until fluffy.
4. After 15 minutes of baking the crust, pull it out and top with the gooey butter mixture.
5. Return to oven to bake for another 40 minutes or until the edges are browning but the inside still feels a little jiggly. It will be puffy, but once it is out, it will deflate some.
6. Allow to cool completely (for several hours) before dusting with powdered sugar and slicing into bars.
I am doing a dessert pairing with my local liquor and wine store this weekend, and one week out from St. Patty's day, obviously they are doing a whiskey tasting. I should also say that we went back into office this week, and my boss gave us all tiny bottles of Screwball Whiskey, so those two things have led to the creation of peanut butter whiskey brownies. The whiskey is obviously optional, but why would you want it to be?
This recipe makes an 8x8 pan of brownies (12 chunky pieces).
I used my regular brownie recipe and just added on/tweaked a bit:
For the Batter:
1 stick unsalted butter
8 oz chocolate chips (you're really going to use the whole 12 oz bag, but 2/3 of it for now)
1/2 c brown sugar
1/2 c granulated sugar
3 eggs
1/2 c flour
1/4 c cocoa powder
1/4 tsp salt
1 oz peanut butter whiskey (you'll use a whole shot total or a travel size bottle)
4 oz chocolate chips for mixins (see, I told you)
For the Peanut Butter Swirl
1/3 c peanut butter (I used creamy, but I can't imagine chunky would be bad)
1 tbsp powdered sugar
1/2 oz peanut butter whiskey
1 1/2 tbsp heavy cream *to thin out- you may need a little more or less
1. Preheat oven to 375F. Prepare pan with some non-stick spray and parchment paper.
2. Combine peanut butter swirl mixture into a small bowl and set aside.
3. Put 8 oz chocolate chips and butter in a heat-safe bowl and microwave in 30 second intervals until chocolate and butter are just melted. Don't over-heat. If there's still a few lumps, just stir, and the residual heat will melt everything.
4. Add sugars to the melted chocolate mixture and combine. This will help cool the chocolate off a little before you add the eggs.
5. Add eggs one at a time and mix well before adding the next. Add 1 oz whiskey.
6. Add flour, cocoa powder, and salt to the bowl and mix well to combine. Don't worry about over-mixing here.
7. Add in the remaining chocolate chips and pour batter into pan.
8. Put dollops of the PB mixture onto the brownies or put in a piping bag and draw lines onto the batter; swirl with a butter knife (this is what I did).
9. Bake for 45-55 minutes or until a toothpick inserted comes out kind of clean. This is such a personal preference. I err on the side of less done, but you know what you like.
10. Allow to cool before removing from the pan and slicing.
This week on another episode of choose your macaron adventure, we have gone down the rabbit hole and landed on cinnamon rolls. This macaron has the signature shell smattered with cinnamon and, obviously, a cream cheese frosting in the middle. I mean, should I eat these for breakfast? Absolutely.
This recipe makes about 18-24 macarons. Just a reminder that a food scale is essential here. And since you're weighing things out, you can always double or triple this batch.
For the Shells:
2 egg whites *this is your base weight; this time it was 69 g for the two egg whites
103.5 g almond flour (1.5 x egg white weight)
103. 5 g powdered sugar (same as above)
55.2 g brown sugar (0.8 x egg weight)
1/8 tsp cream of tartar
1/2 tsp cinnamon
A bit of brown food coloring *optional
1. Prepare two sheet pans with parchment and/or silpats. If you're using parchment, draw circles as a guide for your piping. I use a silpat with the macaron circles and just put a parchment paper over it- the parchment tends to release the shells better, but I can still see the circles for a guide.
2. In a bowl, sift together almond flour, powdered sugar, and cinnamon. Set aside.
3. In a stand mixer fitted with whisk attachment, begin to beat the egg whites. Don't go above a 6 speed on a Kitchenaid. Once they start to get frothy, add in the cream of tartar.
4. While that's whisking, sift your brown sugar. I don't know if this is essential, but you're trying to make meringue, and brown sugar is heavy, so I did it and I'll do it again.
5. Start to gently add the brown sugar to the egg whites while they're whipping up. You want to get to a stiff peak here. It may take a bit longer than you're used to because of the molasses in the brown sugar, but it does whip up quite nicely.
6. Once at stiff peaks, put in half of the dry mixture. Gently fold in.
7. Add in the rest of the dry ingredients and beat the shit out of it. You're looking for the batter to be able to fall back into itself and reincorporate within about 10 seconds.
8. If you'd like, at this point, take about 1/3 of the batter into a second bowl and mix a little brown food coloring.
9. Put the batter into two piping bags. Cut a smaller hole into the brown one and a slightly larger hole into the un-colored batter. Put both bags into a larger piping bag with a large hole cut into it. When you pipe, you will get a little brown swirl like a cinnamon roll.
10. Pipe onto prepared sheet pans and then drop or beat the sheet pans on the counter a few times to get the air bubbles out of the shells. These may be dainty, but they like it a little rough.
11. Allow to cure for at least 30 minutes until they become matte and when you touch lightly with a finger, they don't stick. While that's happening, preheat oven to 350F.
12. Right before baking, drop the oven to 325F and bake for 10-13 minutes. To test if they're done, you can gently touch and it shouldn't move too much on its base. *Bake one tray at a time! If you do more, the air doesn't circulate enough, and it can mess up your shells.
13. Allow to cool before filling.
For the filling:
2 tbsp unsalted butter, room temp
2 oz cream cheese room temp
1 1/2 c (ish) powdered sugar
Splash of vanilla
Pinch of salt
More cinnamon if you like
1. First of all, you don't really need this much filling, but you try mixing up just 1 tbsp butter and 1 oz cream cheese. It's nigh impossible, so here we are. In a small bowl, cream together butter and cream cheese with a hand mixer.
2. Begin to slowly add in cream cheese. Add in vanilla and salt (and cinnamon if you'd like).
3. If the mixture is too thick, you can add a splash of milk or heavy cream.
4. Beat until fluffy and put into a piping bag. Cut off tip and gently squeeze some filling onto a shell. Top with a second shell to make the sandwich cookies. You don't need as much filling as you'd think you do, so make one or two before filling the rest to be sure you have a good ratio.
5. Keep in an air-tight container in the fridge. They really are better the next day.
I have, what I believe to be, the perfect brownie recipe, but blondies have eluded me for a while. I couldn't find exactly what I was looking for.. until I did find it. I did. This recipe is decadent. I mean nutty-butter forward chewy blondies. They're not the prettiest, but they sure know how to party. This recipe makes fatty blondies in an 8x8 or if you want to make them thinner, you could do a larger pan for less time.
For the Blondies:
3/4 c butter, unsalted
1 c brown sugar
1/2 c granulated sugar
3 eggs
1 tsp vanilla
1/2 tsp salt
1 1/4 c flour
1 tbsp malted milk powder *optional, but maybe it shouldn't be
4 oz Heath toffee bits *honestly though, anything could be good in this- butterscotch chips, peanut butter chips, caramel bits. Pick your poison
1. Preheat oven to 375F. Prepare a pan with cooking spray and parchment paper. I like a little overhang of parchment so it's easier to lift them out of the pan later.
2. In a saucepan, melt the butter and continue cooking, stirring intermittently until butter starts to brown. You'll notice that the bubbles will start to dissipate a bit and the butter will start to smell a bit nutty. You'll see the brown flecks start to form.
3. Pour butter into bowl with the sugars. Mix until combined and butter mixture is slightly cooled.
4. Incorporate the eggs one at a time until combined.
5. Add vanilla and salt.
6. Incorporate flour and malted milk powder.
7. Add in toffee bits.
8. Pour batter into prepared pan and bake for about 45 - 55 minutes.
9. Allow to cool before removing from pan and slicing.
This one is a doozy. Do people even say that anymore? Well it's true. She's got a few steps to her, but she's so worth it. The good ones always are. This is a graham cracker sponge, homemade marshmallow fluff filling, smothered in a chocolate buttercream, and doused with chocolate ganache.
This makes a three layer 9-inch round cake or you could do about 2.5 dozen cupcakes.
For the cake:
1/2 c vegetable oil
1/2 c unsalted butter, room temp
1 c brown sugar
1 c honey
4 egg whites
1 tsp vanilla
2 c all-purpose flour
1 1/2 c whole wheat flour
1 tsp salt
1 1/2 tsp baking soda
1 1/2 tsp baking powder
1 tsp cinnamon
1 c sour cream
1/2 c buttermilk
1. Preheat oven to 350F and prep three 9-inch cake pans with goop.
2. In a bowl, combine all dry ingredients (flours, salt, baking soda, baking powder, and cinnamon) and set aside.
3. In a stand mixer fitted with paddle attachment, cream together oil, butter, honey, and brown sugar.
4. Add in egg whites and vanilla and beat for a minute or so to incorporate.
5. Add in 1/3 of the dry ingredients and beat to combine.
6. Add in the sour cream, beat to combine.
7. Repeat with 1/3 dry ingredients.
8. Add buttermilk.
9. End on last 1/3 dry ingredients.
10. Bake for 25-30 minutes or until a toothpick inserted in the middle comes out clean.
For the marshmallow fluff: *This is my normal marshmallow recipe, just tweaked to make it looser. You don't need all of this, but I mean, who's gonna be mad about some extra fluff? But, feel free to 1/2 this recipe if you don't want extra happiness.
1/3 c powdered sugar
1 ½ tbsp unflavored gelatin
½ c cold water
1 ½ c granulated sugar
1 c corn syrup
¼ tsp salt
½ c water *yeah, separate from the other ½ c water.
1. In the bowl of a stand mixer, sprinkle gelatin over ½ c cold water to soften; set aside.
2. In a saucepan, heat granulated sugar, corn syrup, salt, and ½ c water *you see, the second water* over low heat, stirring constantly until sugar is dissolved. Heat to boiling; cook without stirring until it reaches 240F on a candy thermometer or until a small amount of mixture dropped into a cup of ice water forms a ball that holds its shape but is pliable. Remove from heat. *I always do both the thermometer AND the water test. I don't trust my thermometer fully, but it's a good guide to know when to start trying the softball water test.
3. Slowly pour syrup into softened gelatin while beating on low speed *I used the whisk attachment*. Increase speed to high; beat 8 to 10 minutes or until mixture is white and has almost tripled in volume. Add in salt and vanilla and mix to incorporate.
4. Put in a piping bag until assembly.
For the buttercream:
4 sticks unsalted butter, room temperature *yes, this is pretty butter-heavy; trust me, it's delicious 1 c cocoa powder 4 c powdered sugar 1/4 tsp salt 1 tsp vanilla
1. Put butter into stand mixer fitted with paddle attachment.
2. Sift cocoa powder and powdered sugar together.
3. Pour sugar mixture into butter a little at a time until incorporated. Add salt and vanilla to taste.
4. Continue to beat for a few minutes until fluffy. If it feels too tight, add a splash of milk or cream.
5. Place about 1/3 of the frosting in a piping bag and set aside.
For the ganache:
1 c heavy cream 12 oz semi-sweet chocolate chips 4 tbsp (half a stick) unsalted butter, room temp - I almost ALWAYS don't do room temp because I forget to pull the butter out for this; it's fine; just takes a few more mins to melt Pinch of salt 1 tsp vanilla extract
1. Place the heavy cream in a small pan on the stove and heat until just at a simmer. You don't want this to boil.
2. While the cream is heating, put your chocolate and butter chopped into small cubes into a heat safe bowl.
3. Once the cream has heated, pour over the chocolate and butter and cover bowl with plastic wrap for about 5 minutes. *This just ensures that your chocolate will melt and be easier to incorporate.
4. Stir the ingredients together. At first it will look like they aren't coming together. They will. Once it's smooth, I add some salt and vanilla to taste, and make sure to fully incorporate it.
5. You will want this to sit for a while so that it is pourable but will not fall off the cake. We want drips.
Assembly:
1. Place a dollop of frosting onto board or cake stand and put down first layer of cake (feel free to level off the tops of cakes if they're domed).
2. Take the piping bag of buttercream and pipe a thick rim around the top of the cake to make a dam for the marshmallow fluff.
3. Fill in the layer with the marshmallow fluff. Repeat with the second layer.
4. Cover the whole cake in the buttercream.
5. Slowly spoon the ganache on top and guide it down the side of the cake in drips- some people use a squeeze bottle for this. I just give it a little nudge occasionally with my spoon to force it to gently fall down the side of the cake.
6. Decorate with teddy grahams, mini marshmallows, and chocolate pieces.
7. Sit next to a fire and mock it because you got your s'mores dream without any of its help.
On my continued journey of macaron-ing beloved flavors, here are the red velvets. Slightly chocolately, chewy shells with tangy cream cheese frosting in the middle. And they're just so cute, that it makes me want to sing she's a lady, woah woah woah, she's a lady. They're fancy and down to party.
Just a reminder that you will need a food scale for this- you really do want to make sure that your measurements are based on the egg weight. This recipe makes about 2 dozen small macarons.
For the shells:
2 egg whites (for this one, it was 71g - this is my base weight)
106.5 g powdered sugar (1.5 x egg white)
106.5 g almond flour (1.5 x egg white)
12 g cocoa powder (.18 x egg white)
56.8 g granulated sugar (0.8 x egg white)
1/8 tsp cream of tartar
red food coloring *I am not putting a measurement here; I used liquid; I think if you used gel, you may be able to add more and have a more vibrant red, but just be careful if you're using liquid to not use too much- it can mess with the consistency of the batter
1/3 c white chocolate chips for drizzling (optional)
1. Prepare a piping bag with a large round tip and set aside. Line two baking sheets with silpat mat and/or parchment. *You will want to draw a circle template to pipe your macarons on to if you're just using parchment. Even if you have the silpats, I also use the parchment over top because it tends to stick less, but the circles on the silpat are perfect guides for piping.
2. In a stand mixer fitted with whisk attachment, start mixing egg whites. Don't mix them on too high of a speed (no higher than 6 on a kitchenaid). While this starts out, move to the next step.
3. Sift together almond flour, powdered sugar, and cocoa powder in a bowl. *I just put my bowl on my food scale and poured through my sifter until the right weight because I'm lazy.* Put aside until the egg whites are finished.
4. After the egg whites have started to foam up, add cream of tartar. *this is just to help stabilize the merengue, so you can leave it out if you want, but macarons can be finicky bitches, so I use it.
5. Start adding in the granulated sugar to the foamy egg whites a bit at a time. Let mixer keep whipping until you get to stiff peaks, like you see in the picture.
6. Pour in about half of your dry ingredients and the red food coloring into the egg whites. You'd think you have to be gentle here because it's egg whites and you don't want to lose all that air. Nah. You can mix the shit of out of this; it's okay.
7. Pour the second half of dry ingredients in and keep mixing. Here I was a bit more gentle. You want to keep mixing until it looks glossy and it ribbons back on itself.
8. Pour into piping bag and pipe into small circles. Bang on the counter several times to get the air bubbles out. Again, they are delicate, but they also like it a bit rough.
9. Allow to cure until they are matte (not shiny) and are not sticky when you gently touch your finger to it- this can be 30 - 60 minutes depending on the humidity.
10. Preheat oven to 350; before putting in the macarons, turn down to 325F. **You want to bake each tray by itself. If you put in both at the same time, the air doesn't circulate properly.
11. Bake for 10-12 minutes. When lightly tapped, it shouldn't move on its base.
12. Allow to cool completely. Once cool, melt white chocolate in microwave in 15 second intervals. Once melted, put in a piping bag and pipe lines on half of the shells (this feels ambiguous- pipe half of the shells halfway with lines, so half of them will not have chocolate). Allow to solidify before assembly.
For the filling:
2 tbsp unsalted butter, room temp
2 tbsp cream cheese, room temp
1 1/2 c powdered sugar (ish)
Dash of salt
Splash of vanilla
1. In a stand mixer fitted with paddle attachment, cream together the butter and cream cheese.
2. Slowly add powdered sugar, salt, and vanilla.
3. If it feels too thick, you can add a splash of milk or heavy cream as well.
4. Put the filling in a piping bag and cut the corner off. Pipe a small amount of the buttercream onto the center of half of the shells- you will be putting together one non-white chocolated side with one white chocolated side. You will need less filling in each of them than you think. I would suggest fully assembling a few first to see what your ratio should be before filling the rest.
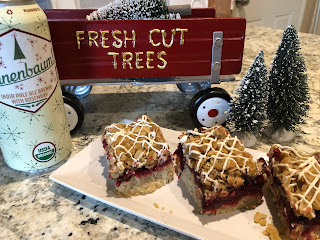
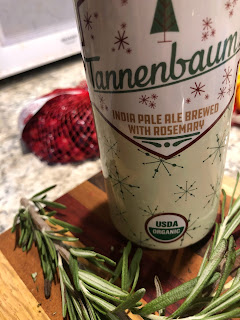
I do a fair amount of markets at one of our local breweries, and I try to incorporate one of their beers into my bakes for the markets. The seasonal delight this time is Old Bakery Beer's Tannenbaum IPA with rosemary, so I decided to make a new shortbread to highlight the season. Get in bitches; we're going sleighing. This recipe makes an 8x8 pan of shortbread (12 bars).
For the Shortbread:
6 oz Tannenbaum IPA from Old Bakery Beer reduced (optional)- *you will not use all of that here; also just a note that you're cooking the alcohol off.
2 sticks unsalted butter, room temp
1/2 c granulated sugar
2 c all-purpose flour
3/4 tsp salt
1 tsp vanilla bean paste (or vanilla extract if you don't have it)
1 tbsp fresh rosemary, finely chopped
1. In a small pan, bring beer to a boil and reduce to about half. Chill before using (I recommend you do this step the day before just for chilling time).
2. Preheat oven to 350F and line 8x8 pan with parchment and spray with cooking spray.
3. In a stand mixer fitted with a paddle attachment, cream together the butter and sugar.
4. Add salt, vanilla, and rosemary and combine.
5. Slowly incorporate the flour until you get to a sandy texture that holds together when you squeeze it in your hands.
6. Pour out into your prepared pan and press down into a solid layer.
5. Par-bake for about 20-25 minutes. While that's baking, move on to the filling.
For the Cranberry Filling:
12 oz fresh (or frozen) cranberries
1/2 c granulated sugar
Zest and juice of one orange
A sprig of rosemary (whole)
1. Cut cranberries in half and place into a saucepan with sugar, orange juice and zest, and rosemary.
2. Bring to a simmer and allow to cook and thicken - mine took about 15 minutes.
3. Remove rosemary sprig and discard; set aside cranberry filling until assembly.
For the Crumb Topping:
1/2 c unsalted butter, cold and cubed
1/2 c all-purpose flour
1/2 c brown sugar
1/2 c rolled oats
Pinch of salt
1/4 tsp cinnamon
1 tsp rosemary, finely chopped
1 tbsp reduced beer
1. Place all ingredients in a bowl and combine. Either use your hands or a pastry cutter to get the butter chunks to about pea size.
Assembly:
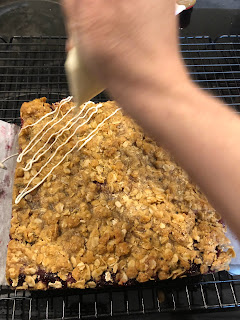
1. Once shortbread is par-baked, pull out of oven and top with the cranberry filling and the crumb topping.
2. Bake again for about 40 - 50 minutes or until topping is golden brown and set.
3. Option to drizzle with melted white chocolate; I took this option, and I'm not mad about it. If you want to do that, just microwave about 4 oz of white chocolate in the microwave in 15 second intervals.
4. Pour into a ziploc bag and cut off a small piece of the corner for a makeshift piping bag and drizzle til your heart's content.
So, I have chickens- the Spice Girls (Cinnamon, Cardamom aka Cardi B, Cumin, Ginger, and Nutmeg), and I have created a barter system with someone: eggs for honey. That's where this recipe came about; I got a lot of honey. Like a lot. I also recognize that this recipe isn't really a looker, but she's got a great personality.
This recipe makes an 8x8 square pan (12 bars). I used pepitas on this, but you could do any kind of seed or nut you want really. You do you, boo.
For the shortbread:
2 sticks unsalted butter, room temp
1/2 c brown sugar
2 c all-purpose flour *If it feels too wet and not very sandy, you can add a bit more. It should just hold together when you squish it in your hand.*
3/4 tsp salt
1/2 tsp cardamom
1 tsp vanilla bean paste (or vanilla extract if you don't have it)
1. Preheat oven to 350 F and line pan with parchment (with a bit of overhang so you can pull it out of the pan for cutting and serving), and spray with cooking spray. I did double parchment going on both sides so all four sides are covered in parchment. We are working with caramel, folks. You don't want tears? PARCHMENT.
2. Put butter and sugar in stand mixer fitted with paddle attachment and cream together for a few minutes.
3. Add vanilla, cardamom, and salt. Slowly add in flour until you get the desired texture (that 2ish cups we discussed).
4. Pour out into prepared pan and press down into a solid layer.
5. Bake for about 40 - 50 minutes until golden brown on top.
6. Allow to cool while you make the honey caramel.
1 c salted pepitas (ish) - I'm not gonna lie; I didn't really measure this...
1. Place the honey and heavy cream in a pot on the stove and bring to a boil. Continue to cook, stirring occasionally, until the caramel is around 240 - 245 degrees. You want it to be loose enough that it won't harden and break teeth. If you aren't sure about the caramel, you can do the water test. Take a cup and fill with ice water. Drop a small amount of the caramel in to the water and see if it forms a soft ball.
2. Once you get to the consistency you're looking for, take off the heat and add vanilla extract and butter, stirring until all combined.
3. Add in the pepitas and pour over the shortbread crust.
4. Allow to cool forever. This part is the bitch of this whole recipe. It'll take like 2 hours or so to cool.
People sometimes are like, how do you decide what you want to try making? Well, here's how it usually goes: I was watching Virgin River, and the main character is like I just want a bath and a coconut cupcake for my birthday, and I was like damn, that sounds good. We always do our low country boil at the end of August, and for some reason, I always want a bundt cake for that occasion. I don't know why my brain has associated these two things, but you know what, every time I hear the song "Like a Prayer" by Madonna, I associate it with the movie Home Alone. I don't fucking know why. Who knows why our brains do what they do. What I DO know is that low country boil equates to a bundt cake, and this year, I needed coconut.
This recipe makes one bundt cake (serves 18ish)
For the Bundt
1 1/4 c shredded coconut, sweetened
3 sticks unsalted butter, room temp
1 c granulated sugar
1/2 c brown sugar
6 large eggs
1 3/4 c all-purpose flour
1/4 c full-fat coconut milk (more needed for glaze as well)
1 1/2 tsp salt
1 1/2 tsp baking powder
1 tsp vanilla extract *you can use coconut extract here; I just don't really like it.
1. In a non-stick pan, put coconut on medium heat and lightly toast, stirring frequently. Do NOT walk away! She's fickle, and she'll burn in a heartbeat.
2. Once toasted, allow to cool for a bit.
3. Take one cup and finely chop in a food processor or with a sharp knife. Reverse the rest for the topping.
4. Prepare bundt pan with goop and preheat oven to 325F.
5. Cream together butter and sugars in a stand mixer fitted with paddle attachment.
6. Slowly add in eggs, making sure to incorporate between each egg.
7. Combine dry ingredients in a small bowl (flour, salt, baking powder). Add them to butter and sugar slowly until incorporated.
8. Add vanilla and coconut milk to the batter and combine.
9. Fold in the one cup of coconut.
6. Bake for 45 - 60 minutes or until a toothpick inserted comes out clean.
For the Glaze
You either already hate me because you know what I'm going to say here, or you have grown confident with your glaze making skills and therefore no longer need me. We measure with our hearts, so I will try to give you an estimate, but really, it's all about the feel.
About 2 c powdered sugar, sifted
Pinch of salt
Splash of vanilla
1/4-1/2 c coconut milk
1. Sift sugar into a large bowl. Add salt.
2. Add vanilla and start to add a little coconut milk and whisk to combine.
3. You are looking for something thick, but that will still run. If it's too thin, add more powdered sugar; if it's too thick, add more coconut milk. Here's my consistency:
Assembly
1. Once the bundt has cooled, turn out onto serving platter. If it sticks to the pan a bit, as mine did, that's okay! Peel it out and slap it back together - you're covering with glaze and coconut anyway.
2. Drizzle with glaze- as you can see in my picture, I went a little overboard with the glaze, and I have no regrets.
3. Top with the remaining 1/4 c of toasted coconut.
I am going to preface this recipe by saying it's really not a lot of a recipe. These are rice crispy treats, y'all. I mean, pretty fucking basic. I WILL say that this is a bit of a glow up for the rice crispies you had as a child. The brown butter makes it a little nutty, and the flakey sea salt give you the balance you didn't know you craved. This recipe makes a 13x9 pan.
For the Rice Crispies:
6 tbsp unsalted butter, room temp
12 oz (ish) marshmallows
6 c rice crispy cereal
1 tsp vanilla bean paste (or vanilla extract if you don't have it)
1 tsp flakey sea salt
1. Prepare a 13x9 with nonstick cooking spray. Keep the spray out as well- you can use this later.
2. In a large pot, begin to melt butter. You will bring it to a boil and stir constantly. At first it will get foamy, and then it will begin to clear a bit, and you will start to see little brown bits. It will also darken in color some as well.
2. Add in 10 oz of marshmallows and vanilla bean paste; stir constantly until all melted and incorporated with the butter.
3. Take off the heat and then add in the rice crispy cereal and the last 2 oz of marshmallow so you get some marshmallow chunks.
4. Pour the rice crispies into the prepared baking dish. Spray hands and pack down into the pan.
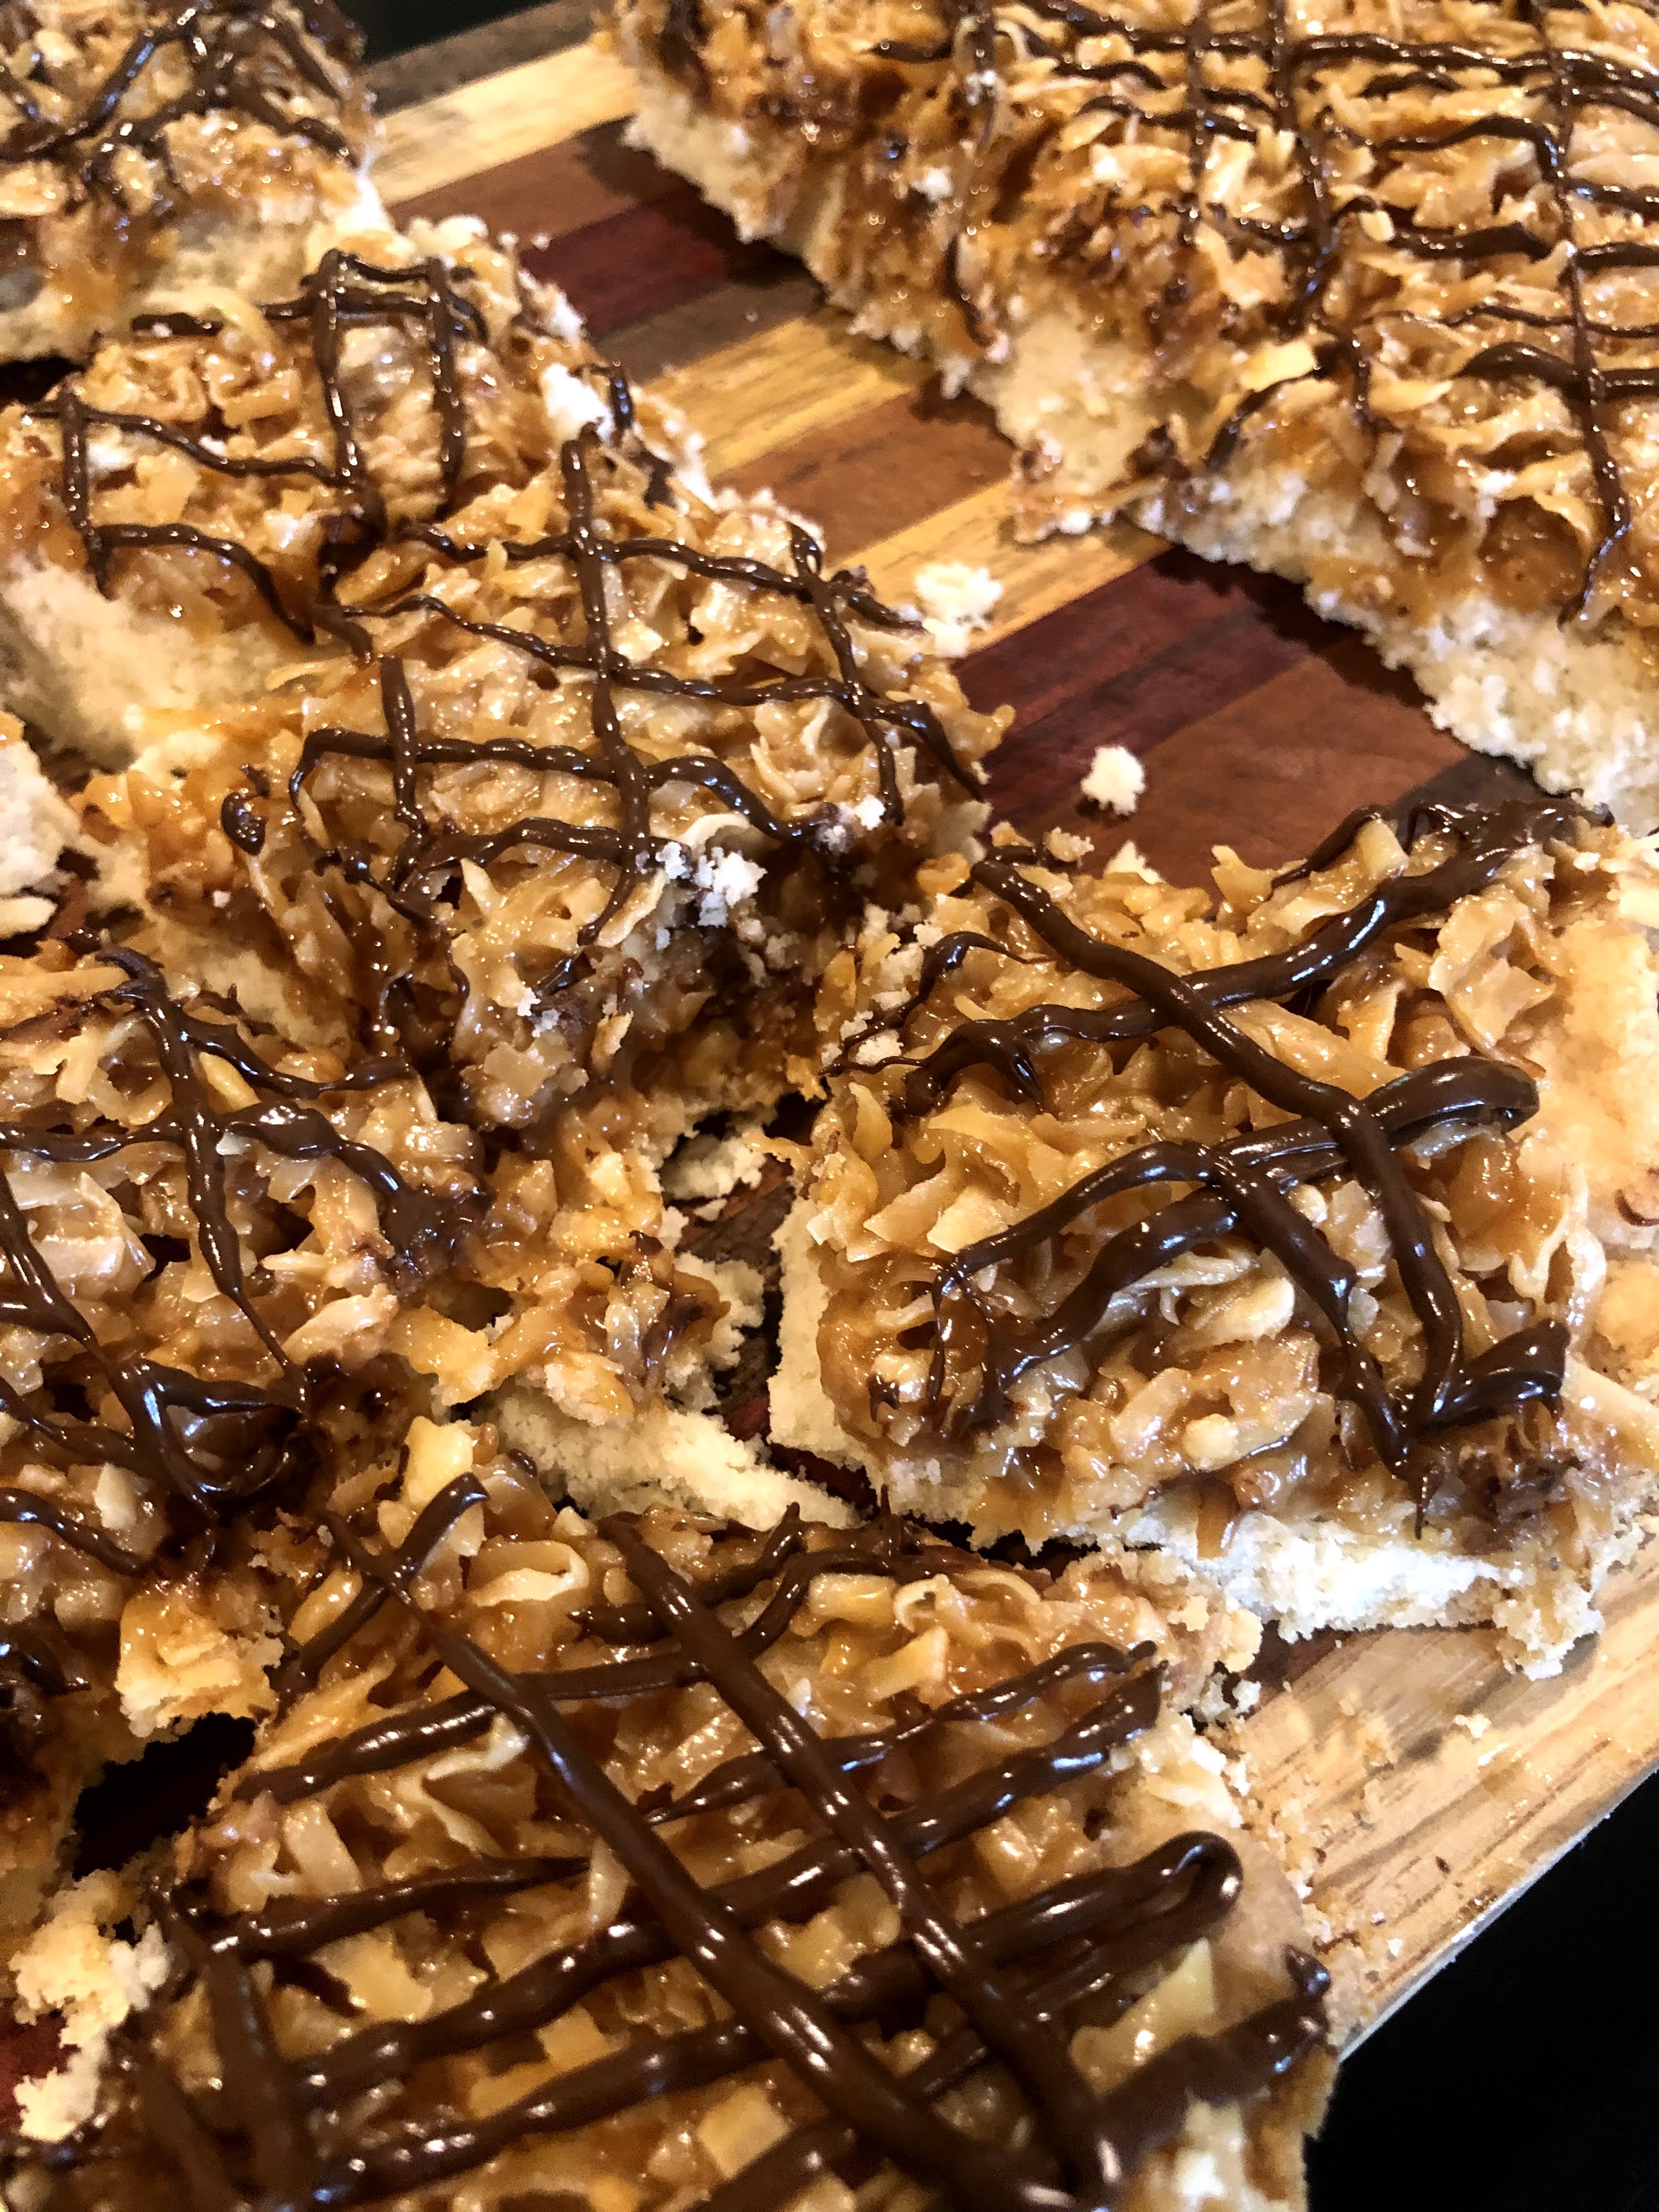
I want to go on record by stating that Girl Scout Samoas are a thing of beauty and I would never say these are better than the original, but I will say that they are pretty damn good. You have a flaky shortbread crust, mountains of toasted coconut smothered in caramel, all drizzled with a little semisweet chocolate. This makes a 9x13 pan, so it's plenty to share (or not share; I won't tell you how to live your life).
For the Shortbread:
1 cup (2 sticks) unsalted butter, room temp
1/2 c granulated sugar
1 tsp vanilla bean paste (or vanilla extract if you don't have it)
3/4 tsp salt
2 c all purpose flour
1. Preheat oven to 375F. Prepare 9x13 pan with parchment paper and non-stick spray.
2. Cream together butter and sugar. Add in vanilla bean paste and salt.
3. Slowly incorporate flour. The mixture will be sandy, but you should be able to push it together in your hand and have it clump. Press dough firmly into prepared pan.
4. Bake for about 20-25 minutes or until the crust is golden brown.
5. Allow to partially cool before adding the coconut layer.
For the Coconut Layer:
2 c sweetened shredded coconut
11 oz bag of caramel bits
3 tbsp heavy cream
1/2 tsp salt
1 tsp vanilla extract
4 oz semi sweet chocolate chips.
1. While the shortbread is baking, put 2 c sweetened shredded coconut into a pan to toast. Make sure to stir frequently. When it gets slightly toasted and fragrant, remove to a bowl for later.
2. Once the shortbread has come out of the oven, you can combine caramel bits, heavy cream, salt, and vanilla into a heat-safe bowl and microwave for 30 second intervals. It will look like it's not going to come together, but it totally will.
3. Toss in the shredded coconut and mix to coat.
4. Spread out evenly onto the shortbread crust.
5. In a small heat-safe bowl, microwave chocolate chips in 15 second intervals until smooth. Put into a piping bag (or a ziploc bag with the corner cut off), and pipe lines onto the top of the bars.
6. Allow to cool completely before cutting. *If you wanted to, you could dip the bottoms of the bars into chocolate as well once they're cut- this will be more reminiscent of the real deal, but it will also be a hot mess, so you do you, boo.