Thursday, March 26, 2020

Coconut Cupcakes with Chocolate Ganache

It's quarantine time, y'all, which means I want to bake, but there's only 3 of us in this house, and I'm not trying to gain 50 pounds, AND I have limited ingredients. It feels like an episode of chopped. Anyway, I wanted to make cupcakes, but I didn't have buttermilk which I always use in my cupcakes (if you've seen any of my other posts, you know), but I did have some coconut milk. It turns out I didn't even have enough coconut milk, so I also used sour cream. All of this to say, I'm gonna give you my recipe, but I am also gonna give you some alternatives because maybe you're like me, stuck at home, and have other ingredients that I don't have and don't have ones that I do!
Also, I tried to just make a dozen cupcakes, so I halved my usual ratios. I still ended up with about 15 cupcakes. If you need more, feel free to double the ingredients.

For the Cake:
1/4 c vegetable oil
1/4 c unsalted butter (1/2 stick), room temp
1 c granulated sugar
2 eggs, separated
1 tsp vanilla extract
1 c all-purpose flour
3/4 c cake flour
1/2 tsp salt
3/4 tsp baking powder
3/4  tsp baking soda
3/4 c coconut milk *I only ended up having 1/2 c left from making muffins earlier in the week, so I did 1/2 c coconut milk and 1/4 c sour cream; you could also just do 3/4 c buttermilk; another good option would be 1/2 c whole milk and 1/4 c sour cream*
**coconut extract - I did not have this. Again, hello shelter in place. IF you do have it, totally use some. Use it sparingly- it is very strong. The cake doesn't really taste like coconut just with the coconut milk - my husband who hates coconut can attest to that. If you don't have extract, that's okay; we are going to coat the buttercream in toasted coconut, so it'll be coconut-y, but if you do have it, use it.

1.Preheat oven to 350F and prepare cupcake pans with liners. Again, it's a little more than a dozen. You could make the remaining  batter into cupcakes or fill a small cake pan. Follow your heart. I did more cupcakes.
2. In a stand mixer fitted with paddle attachment, cream together oil, butter, and sugar. Add in the yolks of the two eggs- keep the whites separate. Add in vanilla extract.
3. In a small bowl, whisk together egg whites until at stiff peaks. Set aside.
4. In a separate bowl, combine all dry ingredients- flour, baking powder, baking soda, and salt.
5. Pour 1/3 of the dry ingredients into the sugar mixture and mix to combine.
6. Pour 1/2 of the coconut milk (or whatever milk you had) into sugar mixture and combine.
7. Pour another 1/3 of dry.
8. Pour second 1/2 of coconut milk and sour cream (if you used it).
9. Pour in the last 1/3 of the dry ingredients.
10. Slowly fold in the egg whites that were whipped up earlier. *This ensures that the batter will be light and fluffy.
11. Distribute into pans and bake for 18 - 22 minutes or until a toothpick inserted comes out clean.
12. Allow to cool completely before filling with ganache.

For the Ganache:
1/2 c heavy whipping cream
6 oz semi-sweet chocolate chips *or any chocolate you like
2 tbsp unsalted butter
Pinch of salt
Splash of vanilla extract

1. Place the heavy cream in a small pan on the stove and heat until just at a simmer. You don't want this to boil.
2. While the cream is heating, put your chocolate and butter chopped into small cubes into a heat- safe bowl.
3. Once the cream has heated, pour over the chocolate and butter and cover bowl with plastic wrap for about 5 minutes. *This just ensures that your chocolate will melt and be easier to incorporate.
4. Stir the ingredients together. At first it will look like they aren't coming together. They will. Once it's smooth, I add some salt and vanilla to taste, and make sure to fully incorporate it.
5. Allow to cool a bit because it will look like this at first:
But it will start to thicken a bit more. You want it to be able to be piped into the cupcakes, but not too runny. If you let it harden too much, then you'll be a little sad when trying to get it into the cupcakes. 

For the Frosting (and topping):
1 c unsalted butter (2 sticks), room temp
3 c powdered sugar
1 tsp vanilla extract *or again, if you have coconut extract, use here, but NOT a tsp; probably much less
Pinch of salt
3/4 c coconut flakes *I'm not gonna lie- I didn't measure this; I just put some in the pan. It feels like it was about this much, and it was plenty. You can use sweetened or unsweetened- I used sweetened because that's what I had.

1. In a stand mixer fitted with paddle attachment, cream butter and slowly add powdered sugar until fully incorporated.
2. Add in vanilla and salt. Beat until fluffy.
3. If it feels too loose, add more powdered sugar. If it feels too stiff, add a splash of milk.
4. Put coconut flakes in a small, dry pan on low-medium heat. Stir frequently until they start to lightly toast. Pay attention here! This shit will burn real fast. Set aside in a bowl for assembly.

Assembly:
1. With a pairing knife, cut a hole in the center of the cooled cupcakes, being careful not to go all the way to the bottom. I cut off the top of the cone that I cut out so that I could put the little "hat" back on top of the ganache. This was just to help it from coming out when you pipe buttercream on top.
2. Put ganache into a piping bag (or a ziploc bag), and cut a hole to pipe ganache into center of each cupcake. Put the "hat" of cupcake back on top of the ganache.
3. Fill a piping bag (or again a ziploc bag) with buttercream frosting, and cut a large hole in the bag. Pipe in the center of the cupcake. You don't have to go to the very edges.
4. Take each frosted cupcake and push the frosting into the bowl of coconut flakes, moving the cupcake around to get it completely covered. I pushed straight down on the buttercream at first so that the cream would come to the edge of the cupcake and then went around the edges of the buttercream as well for full coverage.
5. Try to make people eat your cupcakes so that you don't eat all of them while sitting on your ass in quarantine.


Monday, March 16, 2020

Boston Cream Pie Cupcakes

These little guys are so delicious. It looks like a regular yellow cupcake with chocolate frosting, and then BAM- a sweet vanilla pastry cream is shoved inside! you could totally do this as a cake as well (obviously since that's the normal way to do it), but this recipe makes 24 cupcakes and a smidge more for a baker's treat! You do want to make the pastry cream in advance so that it has time to cool off before filling the cupcakes.

For the Pastry Cream:
1 2/3 c heavy whipping cream *I usually do half milk and half whipping cream, but I only had whipping cream at home, so I did all whipping cream, and it was delicious 
½ c granulated sugar
Pinch of salt
4 large egg yolks
½ c flour
4 tbsp unsalted butter, cold
1 tsp vanilla extract 

1. In a medium heat-proof mixing bowl, whisk together egg yolks, salt, and sugar until completely combined and a bit frothy. *If you're doing this alone, use your stand mixer bowl. This way you can stick it on the base so that it doesn't move later when you need to pour and whisk at the same time.
2. Add flour and set aside while heating cream.
3. Heat heavy cream and butter on the stove until simmering. Take off the heat when mixture starts to simmer *you don’t want it to boil.
4. Slowly add cream mixture into the egg yolk mixture, stirring constantly. Whisk well. *Be gentle- you don’t want to cook the eggs, so baby steps here, folks.
5. Return the mixture to the pan and bring to a simmer, stirring constantly. The mixture will thicken within a few minutes. Take off heat once it’s thick and add in vanilla extract.  
6. Cool to room temperature and transfer into a bowl with a lid to be refrigerated. It needs to cool at least four hours or overnight.
**I actually had to do my pastry cream twice because I fucked it up the first time. I think I heated the mixture too hard and fast the first time, and then my pastry cream was all weepy (see left picture). The second time, I went slower, lifting the pan off the heat every once in a while so that my cream didn't get too hot too fast. See right picture for pretty pastry cream. 
 

For the Cupcakes:
1/2 c vegetable oil
1/2 c unsalted butter (1 stick), room temp
2 c granulated sugar
3 eggs, separated
1 tsp vanilla extract
2 c all-purpose flour
1 1/2 c cake flour
1 tsp salt
1 1/2 tsp baking powder
1 1/2 tsp baking soda
1 1/2 c buttermilk


1.Preheat oven to 350F and prepare cupcake pans with liners and grease a small (I usually do 6 in) pan for the extra batter.
2. In a stand mixer fitted with paddle attachment, cream together oil, butter, and sugar. Add in the yolks of the three eggs- keep the whites separate. Add in vanilla extract.
3. In a small bowl, whisk together egg whites until at stiff peaks. Set aside.
4. In a separate bowl, combine all dry ingredients- flour, baking powder, baking soda, and salt.
5. Pour 1/3 of the dry ingredients into the sugar mixture and mix to combine.
6. Pour 1/2 of the buttermilk into sugar mixture and combine.
7. Pour another 1/3 of dry.
8. Pour second 1/2 of buttermilk.
9. Pour in the last 1/3 of the dry ingredients.
10. Slowly fold in the egg whites that were whipped up earlier. *This ensures that the batter will be light and fluffy.
11. Distribute into pans and bake for 18 - 22 minutes or until a toothpick inserted comes out clean. 
12. Allow to cool completely before filling with pastry cream.  

For the Frosting: 
4 sticks unsalted butter, room temperature
1 c cocoa powder
1/8 c black cocoa powder *if you don't have this, it's fine- you can just add a bit more cocoa powder- this just makes it a little darker and richer.
4 c powdered sugar
1/4 tsp salt
1 tsp vanilla

1. Sift together powdered sugar and cocoa powders in a large bowl.
2. In a stand mixer with paddle attachment, cream butter.
3. Slowly add powdered sugar and cocoa powders to the butter.
4. Add salt and vanilla and mix to incorporate.
5. If it seems too loose, add a bit more cocoa powder; if it seems really tight, you can add a bit of heavy cream or buttermilk to it.

Assembly:
1. Take a pairing knife and cut out the center of each cupcake, making sure to not go all the way to the bottom of the cupcake.
2. Place cooled pastry cream in a piping bag or a ziploc bag with the corner cut off. Fill each cupcake hole with pastry cream.
3. Place buttercream in a piping bag and snip the end off. Starting from the outside, pipe around until you have the cupcake and the cream covered. *You can also use a different tip if you want, but I just went for the straight swirl. I would say it's easier to do this with a piping bag instead of just an offset spatula because you have that pastry cream sticking out of the top of the cupcake.
4. Serve immediately- if you have leftovers or are making these ahead of time, put them in the fridge since they have the pastry cream in them. When you go to serve, just take out of the fridge about 30 minutes beforehand and they'll warm back up to room temp.

Saturday, March 14, 2020

Smore's Pie

It's Pi(e) Day y'all! This is what we have all been waiting for.
An entire day devoted to eating one of my favorite things of all time. For this momentous occasion, I decided to make a smore's pie. Not just any smore's pie, but a pie with a homemade graham cracker crust- a giant crust of graham cookie. A pie filled with chocolate ganache. A pie topped with homemade  marshmallow. A pie torched to have a nice little campfire afterglow. Can you tell I'm excited? No? Well just you wait!

One side note, this is a bit time consuming- most of it is the amount of time you have to wait. This is NOT a make the same day you want to eat it pie- the marshmallows need like 8 - 24 hours to set up before eating, so there's that. Make it the day before and then try to wait patiently... It's hard.

For the Graham Crust:
Now, I have made homemade grahams before, and you can see that post here, but I also made a few modifications. I don't think I made these modifications because I was putting it in a pie, but because the grahams are kind of a bitch, and this is easier. So, here is the original recipe, and I will let you know the changes I made as we go.

1 1/2 c all-purpose flour
1 1/2 c whole wheat flour
3/4 c brown sugar
1 tsp baking soda
1 tsp cinnamon
1/2 tsp salt
3/4 c unsalted butter, cold
1/3 c honey
1 tsp vanilla extract
5 tbsp (ish) heavy cream (or milk is fine) *Yes, this is still true, but I did like 6 or 7 tbsp to help hold it together a bit more. Did a lose a smidge of the flakiness? Yes. Was it so much easier that I really don't care? Also, yes.

1. Combine flour, sugar, baking soda, cinnamon, and salt in large bowl. *You can also do this in a food processor, but mine is tiny, so here we are.
2. Grate in butter and combine until a coarse meal texture. *Grating makes the butter into smaller pieces, and it is easier to combine. **If you are using a food processor, just pulse in your cubed butter until coarse meal.
3. Add honey and vanilla into flour mixture and stir to combine.
4. Add in heavy cream. Start with 4 tbsp and see how it is. You are looking to have your mixture just come together. It is a little dry, but it should stick together when you press it in your hand. It may take more or less cream depending on the humidity. It takes me generally 5 tbsp (ish). *Again, I added more this time. Follow your heart.
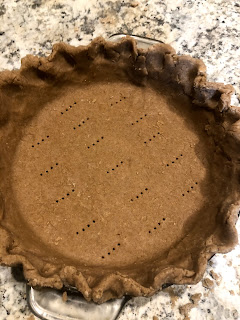
5. Turn out dough onto a clean surface. Work the dough to combine (but try to work it as little as possible). Divide dough into two parts and pat into two rectangles. Wrap in plastic wrap and allow to cool in the fridge for at least two hours or overnight. *I DID NOT CHILL! I just divided dough into two parts (you only need about half the dough for this pie, but why wouldn't you also make some mini grahams? See pics below!)
6. Take out the dough and roll out one of the balls about 1/4 inch thick and large enough to be able to cover a pie pan. *See, it's so much easier to roll out if it's not cold. Sorry Past Jenna, but Present Jenna has won.
7. Take the rolled dough and place into a pie pan. The pan doesn't need to be greased. Crimp your edges to your liking and poke holes in the bottom with a fork to help prevent too much rising while it bakes. Now, you do chill. At least 30 minutes in the fridge before baking. If you're in a rush, freezer for 10 minutes. *I didn't blind bake this, but you can totally do that to help weight it down a bit.
8. Roll out second half of your dough and cut crackers into rectangles. *I also poked holes in them so they looked more graham cracker-y. Chill again for 30 minutes before baking.
9. While chilling, preheat oven to 350F.
10. Bake crackers for 12 - 15 minutes if they're small like mine. *Mine were about 1 1/2 in x 1 1/2 in.
If they're bigger, like my usuals, then about 15 - 22 minutes. Bake the pie crust for about 25 - 30 minutes or until golden and pretty firm to the touch.
10. Allow to cool completely before filling with ganache. At least you made little baby grahams to eat as a snack right now!

For the Chocolate Ganache:
This is the easiest step. Side note, this by itself, chilled in the fridge, rolled into balls and covered in your choice of toppings is a super easy truffle that everyone loves.

1 c heavy cream
12 oz chocolate *this is whatever chocolate you want. This can be fancy dark chocolate. For me, in this case, I did straight up a bag of semi-sweet chocolate chips.
4 tbsp (half a stick) unsalted butter, room temp * I forgot to room temp my butter- it's fine- it may just take a few mins longer to melt.
Pinch of salt
1 tsp vanilla extract

1. Place the heavy cream in a small pan on the stove and heat until just at a simmer. You don't want this to boil.
2. While the cream is heating, put your chocolate and butter chopped into small cubes into a heat safe bowl.
3. Once the cream has heated, pour over the chocolate and butter and cover bowl with plastic wrap for about 5 minutes. *This just ensures that your chocolate will melt and be easier to incorporate.
4. Stir the ingredients together. At first it will look like they aren't coming together. They will. Once it's smooth, I add some salt and vanilla to taste, and make sure to fully incorporate it.
5. Add all the chocolate into cooled pie crust. Allow to sit for several hours at room temp before adding the marshmallow. You can also put it in the fridge to speed up the process. I didn't do that because (1) I didn't want the crust to be in the fridge because I thought it might change the texture, and (2) I went shopping with my mom, so I had the time. On the counter, it took probably 3 hours or so to set up.
 

For the Marshmallows:
Again, this is not a new recipe. You can find the original post about marshmallows here. The only thing I have changed for this is really the vehicle into which you put the marshmallows. Again, this will make WAY more marshmallow than you need for the pie. Again, I say, great! You have extra grahams as well. Buy a chocolate bar, and you're good to go!

2 ½ tbsp unflavored gelatin
½ c cold water
1 ½ c granulated sugar
1 c corn syrup
¼ tsp salt
½ c water *yeah, separate from the other ½ c water. I know. It was confusing to me too. It’ll all make sense, I promise.
1. Generously grease the bottom and sides of an 8 x 8 glass baking dish. Dust pan with powdered sugar. This will be for the extra marshmallows. 
2. In the bowl of a stand mixer, sprinkle gelatin over ½ c cold water to soften; set aside.
3. In 2-quart saucepan, heat granulated sugar, corn syrup, salt, and ½ c water *you see, the second water* over low heat, stirring constantly until sugar is dissolved. Heat to boiling; cook without stirring about 30 minutes to 240F on a candy thermometer or until a small amount of mixture dropped into a cup of ice water forms a ball that holds its shape but is pliable. Remove from heat. *Okay, so I don’t know if it’s because I have an electric stove top, or what, but 30 minutes is insane. I got to soft ball stage at like 12 minutes. Trust your candy thermometer, and if you still aren’t sure, which I never am, do the water trick- have a small glass filled with water and ice by your station. When you think it's at the right temp, drop a spoonful of the mixture into the ice water. If it makes a soft ball that feels pliable in your fingers, you are good to go. 
4. Slowly pour syrup into softened gelatin while beating on low speed *I used the whisk attachment*. Increase speed to high; beat 8 to 10 minutes or until mixture is white and has almost tripled in volume. Add in salt and vanilla and mix to incorporate.
5. Slowly pour some of the marshmallow mixture onto the pie. Again, follow your heart- you know how much is enough. Then place the rest of the mixture into the prepared 8 x 8 pan. Place both pie and marshmallow pan somewhere safe from children, dogs, spouses, to set up overnight. 
6. When ready to serve the pie, cut up into small pieces (this part's a bitch- sorry) and torch marshmallows with a kitchen torch! Fun and interactive for a party as well. 

Here's a little bonus video of my dog eating fresh marshmallow fluff :)

Tuesday, March 3, 2020

Cinnamon Roll Cookies

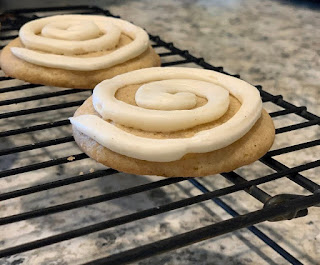
Okay, so I have finally figured out the texture for cookies that I want. Thank you guys for following along with me as I stumble through this shit show of figuring out recipes! At least there's some deliciousness along the way. These cookies came about because I had cream cheese in the fridge and I wanted cream cheese frosting but wasn't feeling like committing to a cake or waiting like 8 hours for real cinnamon roll dough to rise. That's what happens. We call this inspiration. So, this recipe has a cinnamon cookie that is delightfully chewy with a swirl of cream cheese frosting, and it was exactly what I wanted it to be. This recipe makes about 3 dozen cookies.

For the Cookies:
1 c (2 sticks) unsalted butter, room temp
1/2 c brown sugar
1/2 c granulated sugar
2 eggs
1 tsp vanilla extract
2 c flour
1/2 tsp baking soda
1/2 tsp baking powder
1/2 tsp cinnamon
3/4 tsp salt

1. Preheat oven to 350F.
2. In a stand mixer fitted with paddle attachment, cream together butter and sugars.
3. Add one egg at a time, mixing to incorporate. Add vanilla.
4. In a separate bowl, combine dry ingredients- flour, baking soda, baking powder, salt, and cinnamon. Slowly add to the wet ingredients and mix to combine.
5. Allow dough to chill in fridge for about 30 minutes.
6. Scoop out balls and place onto cookie sheet. Bake 8 - 12 minutes or until slightly golden around the edges. *mine took about 12, but my oven always tends to take longer*
7. Allow to cool completely before frosting.
For the Frosting:
4 tbsp (1/2 stick) unsalted butter, room temp
4 tbsp (1/2 box) cream cheese, room temp
2 c (ish) powdered sugar
1 tsp vanilla
Pinch of salt
*splash of milk to thin- this is optional, but I felt like it needed it so I could pipe. I actually used almond milk because that's all I had in my house at the time
*also optional, a pinch of cinnamon- I did this to boost the cinnamon roll vibe I was going for

1. In bowl of stand mixer fitted with paddle attachment, cream together butter and cream cheese.
2. Add in powdered sugar slowly, a little at a time.
3. Add in vanilla and salt.
4. If you want, add in cinnamon and the splash of milk.
5. Place in a piping bag and cut a small hole in the tip and pipe swirls on cookies starting from the center to resemble cinnamon rolls!

Gluten Free Brownies

This recipe is riffing off of a flourless chocolate cake recipe I have used in the past. So, like duh, it's already, gluten free, but I ...