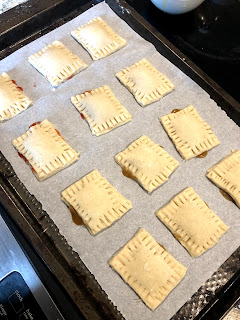
Still following the 52 weeks of baking challenge on Reddit, and this week is "bite-sized", so I made some mini pop tarts! These don't really taste like store bought pop tarts, but that's not really a bad thing is it? Plus, they're super easy to make. This recipe makes about 18 mini pop tarts (2 in X 2.5 in).
For the crust:
2 c all-purpose flour
1 tsp salt
1 tbsp granulated sugar
1/2 tsp cardamom *optional*
2/3 c unsalted butter, cold
1/3 c *ish* heavy cream (or milk is fine here too)
1 tbsp white vinegar
1 egg (for the egg wash when assembling)
1. Preheat oven to 425F and line two baking sheets with parchment paper.
2. Combine flour, salt, sugar, and cardamom in a bowl. Using a cheese grater, grate in the butter and then incorporate with a pastry cutter until you have pea-sized pieces of butter throughout the mixture. *You can also do this in a food processor. I have a baby food processor, so here we are, doing it old school.
3. Add vinegar and stir to incorporate.
4. Add heavy cream in a bit at a time, mixing as you go, until the dough starts to come together. For me, I made these in February. It's dry. I added a good amount more of the heavy cream this time.
5. Turn out onto a clean surface and form into a ball. Wrap in plastic wrap and allow to to chill in the fridge for about 30 minutes. *I'm gonna be honest; I didn't chill it this time because I wanted pop tarts stat, and it was fine, so follow your heart.
For the fillings:
*I did three different fillings because I wanted to try out a couple of different options.
Strawberry jam *I used store bought. I'm not Ina. I can do that.
Nutella *Again, store bought. Come at me.
Brown sugar mixture:
1. Place 2 tbsp butter in a bowl and melt in microwave.
2. Add a pinch of salt and about 1/2 - 3/4 c brown sugar. *I'm not gonna lie, I didn't measure how much brown sugar. You want it to be pretty thick. We are trying to prevent it from just straight up running out off the pie crust.
Assembly:
1. Roll out the pie crust dough to about 1/8 inch thick. Cut into rectangles (like I said, I did 2 inch x 2.5 inch). I DID also re-roll out the jagged edges again to get more rectangles, and it was fine.
2. Place half of your rectangles onto the parchment lined baking sheets.
3. Take one spoonful of your desired filling and put it in the middle of each square. *You don't want to over fill here. It will all come out the sides if you do. Ask me how I know...
4. Crack the egg in a small bowl and mix it with a splash of water to make an egg wash.
5. Take another rectangle and brush the edges of it with egg wash. Place that side down on top of a rectangle with filling. You're making a glue for the two crust pieces to stick together.
6. Use a fork to crimp the edges so that the crust stays together. *I tried the first one without the egg wash, and it didn't hold well, so the egg wash is a must.
7. Once all assembled, brush the tops of each tart with egg wash.
8. Bake at 425F for about 20 - 25 minutes or until golden brown.
9. Allow to cool before glazing.
For the glaze:
1/4 c heavy cream or milk
1/2 c powdered sugar, sifted *again, I didn't really measure these. We are making a glaze. We measure with our hearts (and our eyes).
Pinch of salt
Splash of vanilla extract
1. Pour heavy cream and vanilla extract into a bowl.
2. Sift in the powdered sugar and add the pinch of salt. Stir to combine. If it's too thin, add more powdered sugar. If it's too thick, add more heavy cream. I wanted a THICK paste that I could slather on with an off-set spatula instead of a dunking situation. See below.
3. Once tarts are cooled, slather with glaze and add sprinkles or sanding sugar.


No comments:
Post a Comment